Integrating liquid handling chemistry.
Lego robotics and programming in Python.
This lesson is based on the work presented in the paper “Liquid-handling Lego robots and experiments for STEM education and research”, published in March 21 2017 at PLOS Biology, by Lukas C. Gerber, Agnes Calasanz-Kaiser, Luke Hyman, Kateryna Voitiuk, Uday Patil, Ingmar H. Riedel-Kruse. Full paper can be retrieved here
Group Size 3-4
Grade Level 9-11
Time required 4-5 hrs
Aim of the lesson
In this lesson the students are going to build and program a liquid handling robot from a single Lego Mindstorms kit EV3 core set and some easily accessible additional parts. This robot can pipette liquids and address 20 cuvettes placed on a ruler. The three motors and the color sensor included in the robot set will be controlled over the EV3 Python programming language. The building and experiments can be split into five 90-minute sessions.
Learning Objectives
Developing a predesigned liquid handling robot with Lego EV3, as well as exploring chemistry experiments that could be done on this robot.
Understanding chemistry theory concepts: density, mixing colored solutions, dilution series of colored solutions, dilution factor, salt gradient density layers, concentrations of colors, and practice them with robot experiments.
Follow the instructions directly from either the Lego Digital Design program or the HTML version of the guide to build the robot.
Get in touch with robotics engineering, using the smart brick, the motors, the beams, the connectors and the sensors (color, push) from the Lego Mindstorms EV3 set
Learn to boot the smart Lego brick with the EV3Dev operating system from a preconfigured SD card and setup a network connection between the PC and the brick.
Program the smart brick to automate liquid handling experiments using the programming language Python.
Understand why pipetting is important for scientists
Increase conceptual understanding of why objects float and sink
Expand students’ existing perception of what robots are about. Understand that robotics can be applied in the real world in disciplines which don’t focus on engineering, like doing science with robots.
Do something more impressive than car like motion robot
Manage to work in groups and collaborate
Overview
The supporting materials to this document contain detailed information about building the robots, materials needed, suggested experiments and code solutions of suggested experiments in the proposed worksheets. At the end of the document, you can find the proposed worksheets.
Robot - Building instructions, materials and experiments
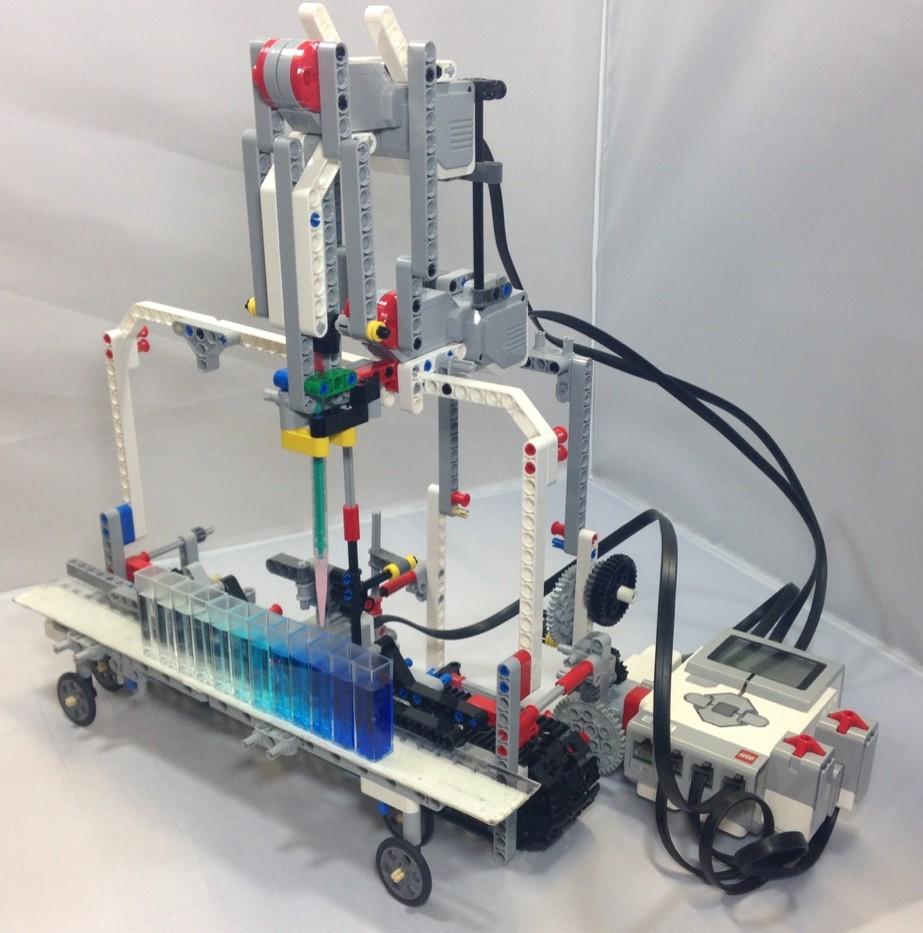
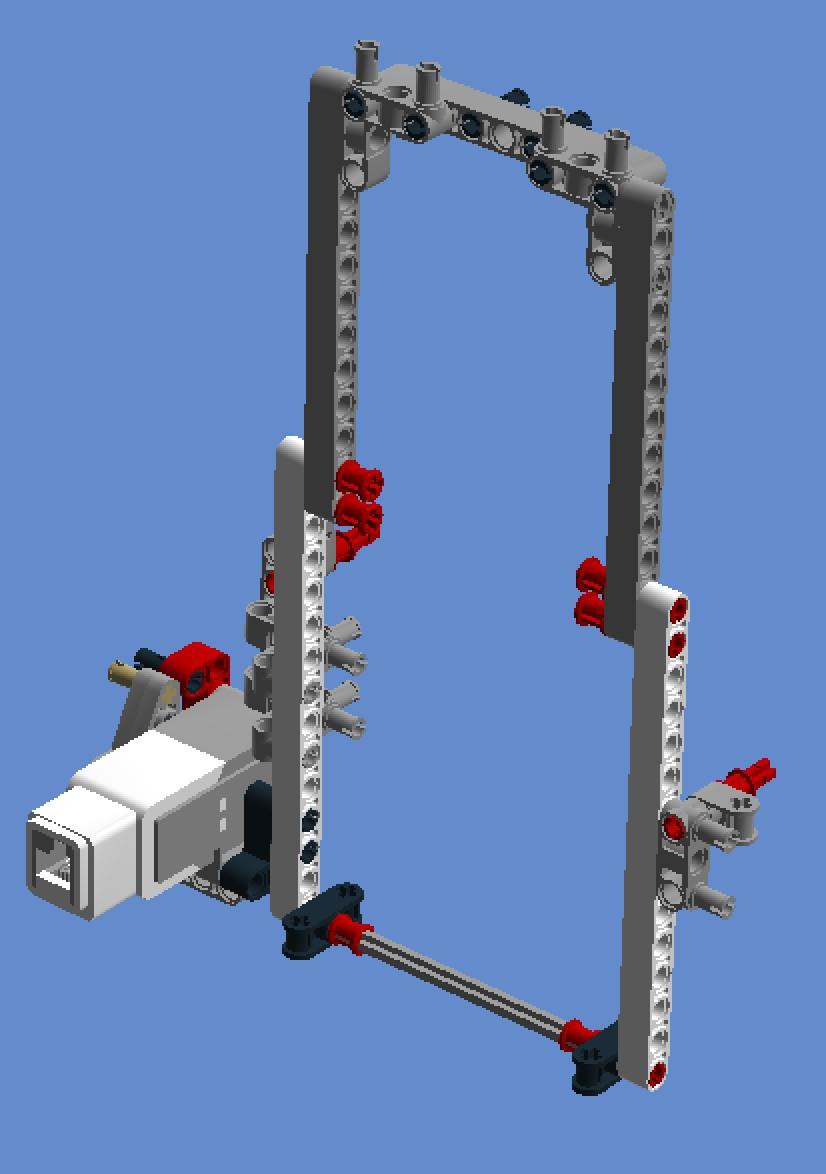
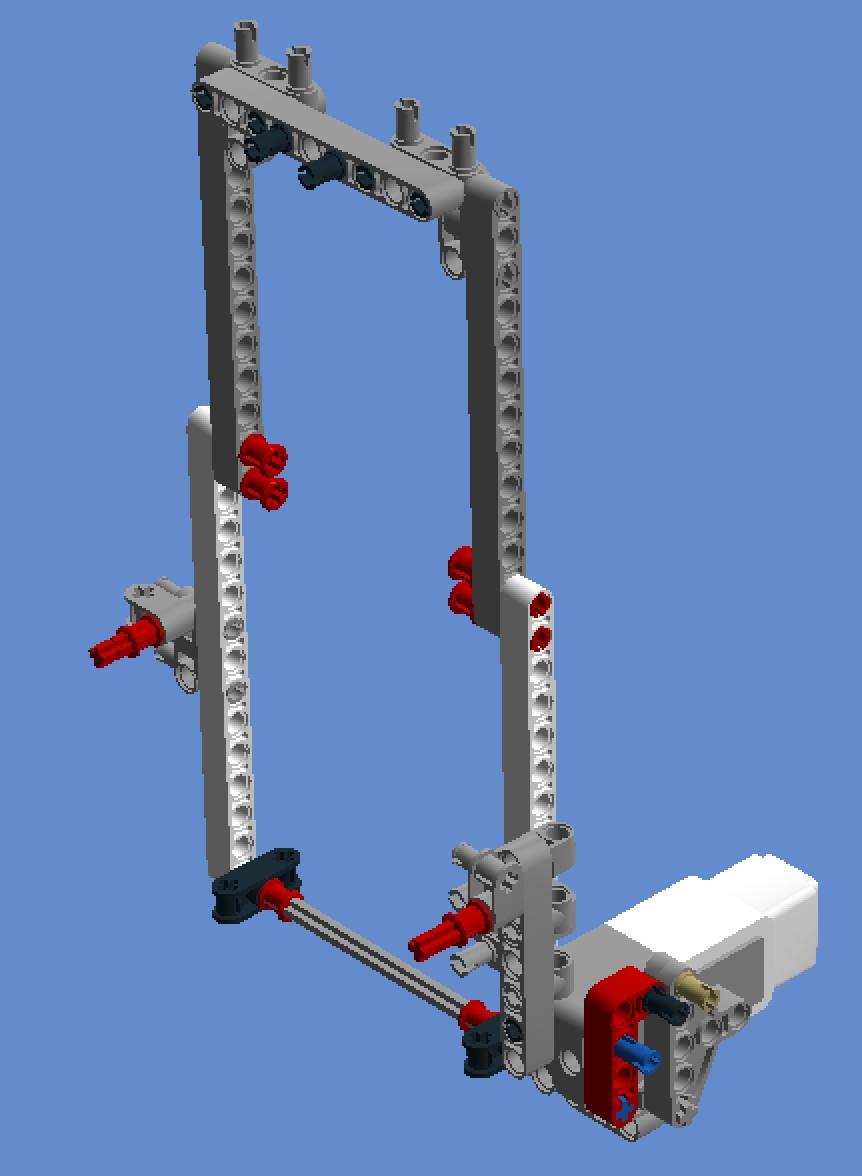
The robot presented here can be built from a single Lego Mindstorms kit (EV3 Core Set 45544) and some easily accessible additional parts. This robot can pipette liquids and address 20 cuvettes placed on a ruler. The following photos and separate files will allow other users to replicate and use the robot presented here.
Additional material suggested for the experiments are: Cuvettes (Standard Cuvette Polystyrene Macro 3.5 mL), syringes (Plastic Syringe, Luer Slip, 1 mL,), tips (Dispensing Needle, Plastic Tapered Pink 20 ga 0.024id x 1.2), food color (AmeriColor Beginner Soft Gel Paste Food Color 4 Pack Kit), a ruler, double-sided carpet tape and instant glue.
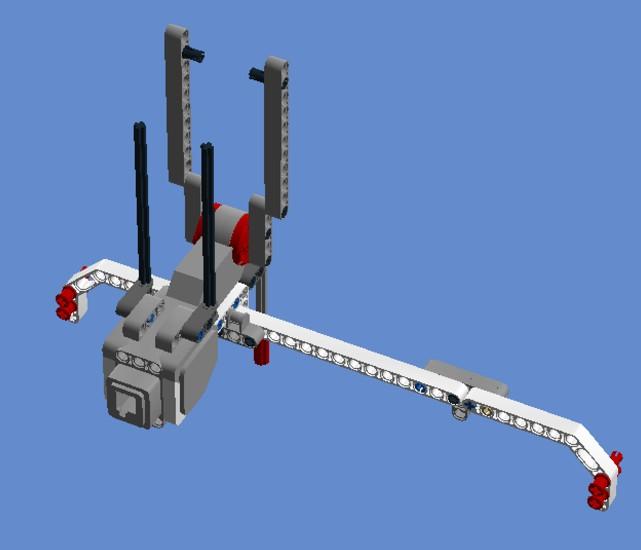
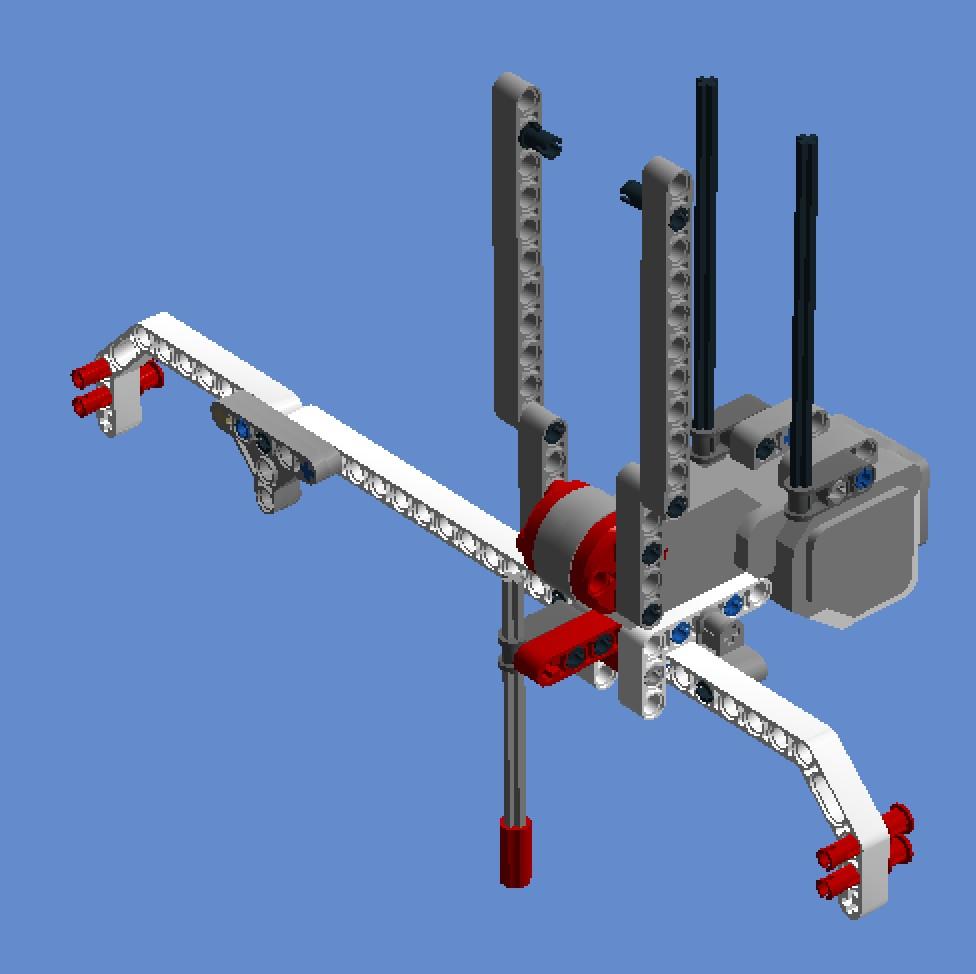
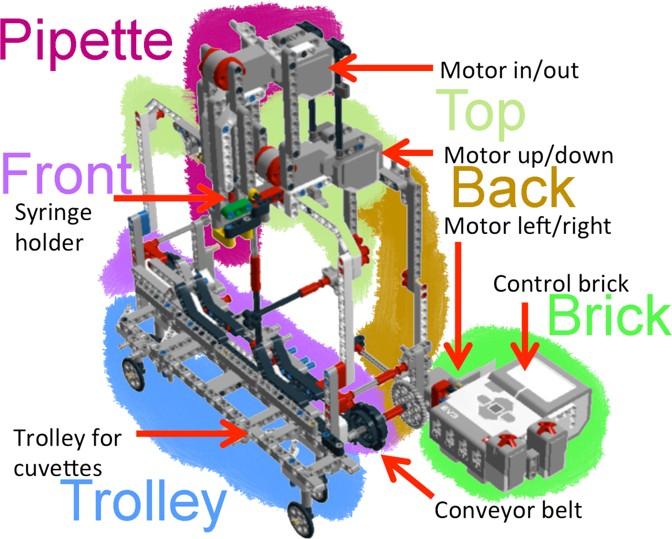
Fig 1. Robot overview.
Building robot using CAD file and close-up photos
There are five structural modules (1_Pipette, 2_Back, 3_Front, 4_Top, 5_Trolley), the control brick module (6_Brick), and two optional modules (7_Sensor, 8_Gears) that make up the whole robot. We provide separate CAD files to construct these parts separately. To combine the syringe with the Lego part, a red Lego peg included in the kit can be glued to a syringe plunger. Cuvettes can be mounted on the robot via double-side tape on the ruler.
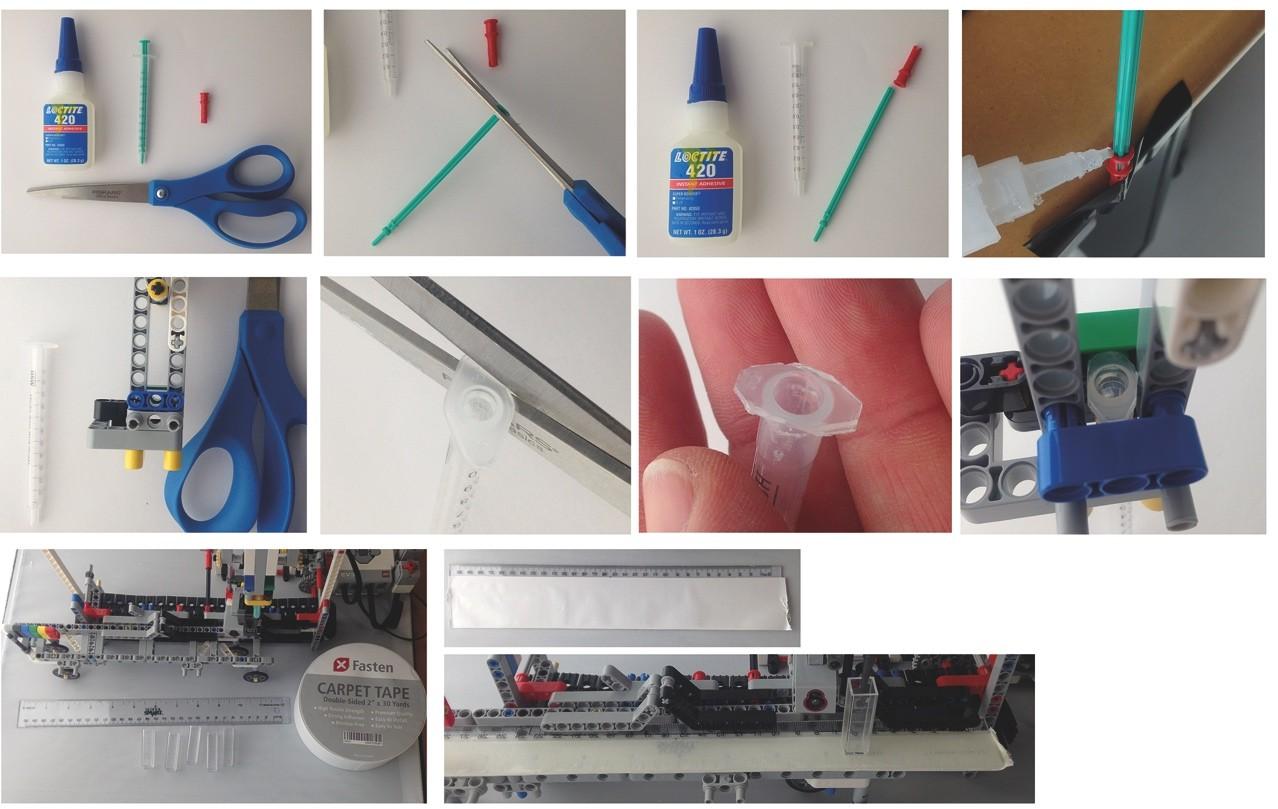
Fig 2. To attach the syringe’s plunger to the robot, cut off the top of the plunger, insert it into the red Lego piece and apply some instant glue. Cut away some of the plastic holding piece of the syringe’s tube in order to fit it into the robot.
Cuvettes can be easily placed onto a ruler using double-sided tape.
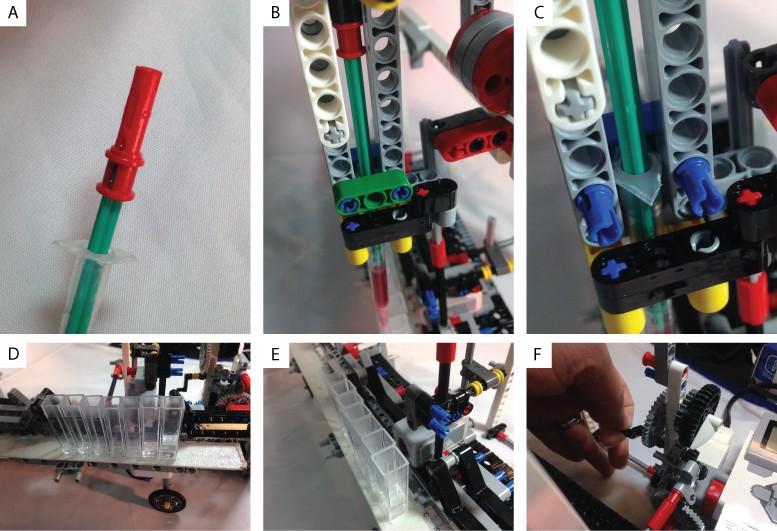
Fig 3.
Prepared syringe with super glued red Lego piece and cut holder.
Insert syringe while the green piece is temporarily removed. Then reinstall the green piece to lock the syringe in place.
as above
Double-sided carpet tape on a plastic ruler allows securely placement of up to 20 cuvettes. Cuvettes can be replaced many times and even small liquid spills did not affect the tape’s performance critically.
A color sensor mounted behind the cuvettes allows for readout concentration and colors.
Gears allow us to manually move the trolley over a crank.
CAD files:
0_all_in_one.lxf
1_Pipette.lxf
3_Front.lxf
4_Top.lxf
5_Trolley.lxf
6_Brick.lxf
7_Sensor.lxf
8_Gears_(with_2_Back).lxf
The CAD file 0_all_in_one.lxf contains the whole robot. This file gives an overview and shows how the different pieces come together. To build the robot, we recommend using the “Building mode” in the Lego Digital Designer for each separate part (1_Pipette.lxf, 2_Back.lxf, 3_Front.lxf, 4_Top.lxf, 5_Trolley.lxf, 6_Brick.lxf, 7_Sensor.lxf). In the building mode, it may be difficult to see the correct length of axles. Therefore table 1 below gives additional details for each CAD files when in *Building guide
mode (F7)*:
Table 1.
Axle length (L) guide for the individual parts of the robot.
1_Pipette |
Step 7, L=4 |
Step 8, L=3 |
Step 10, L=4 |
Step 11, L=3 |
Step 14, L=5 |
||||
2_Back |
Step 8, L=9 |
Step 17, L=3 |
|||||||
3_Front |
Step 7, L=8 |
Step 11, L=7 |
Step 16, L=3 |
Step 23, L=5 |
Step 26, L=8 |
Step 28, L=8 |
Step 34, L=3 |
Step 36, L=8end |
Step 37, L=4 |
4_Top |
Step 4, L=5 |
Step 12, L=12 |
Step 14, L=12 |
Step 16, L=9 |
|||||
5_Trolley |
Step 1, L=5 |
Step 8, L=5 |
Step 10, L=6 |
Step 20, L=4 |
|||||
7_Sensor |
Step 1, L=8 |
Step 4, L=7 |
|||||||
8_Gears |
Step 3, L=9 |
Step 8, L=7 |
Step 11, L=3 |
Step 13, L=3 |
Step 15, L=4end |
Step 20, L=4end |

Front module
|
|
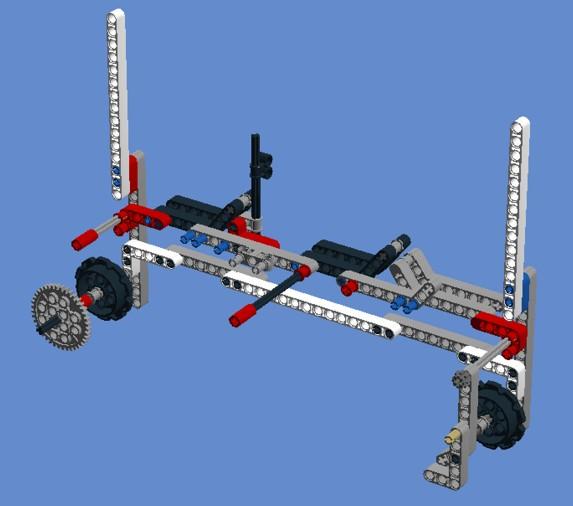
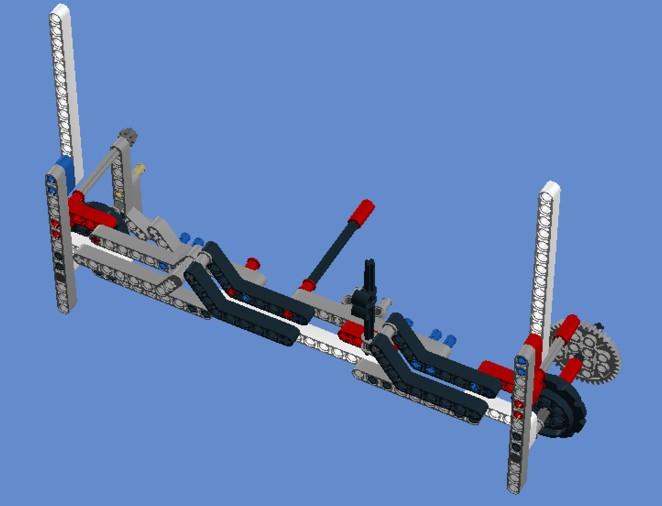
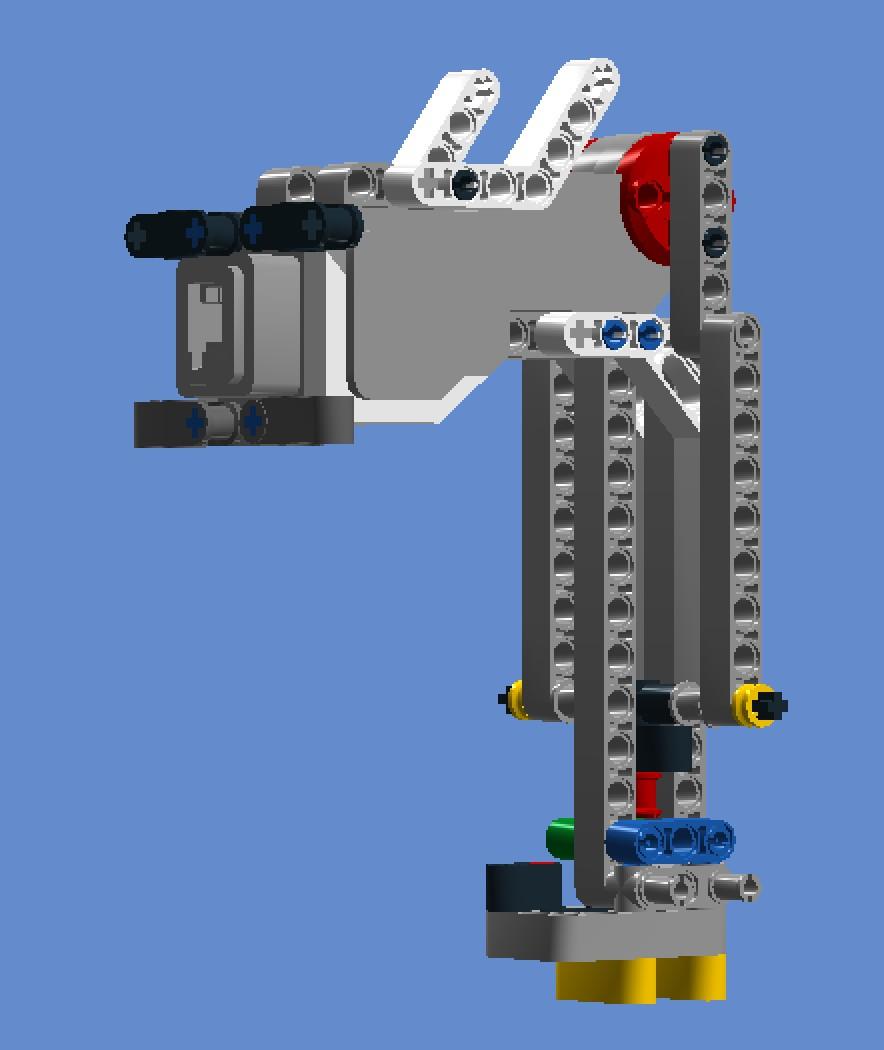
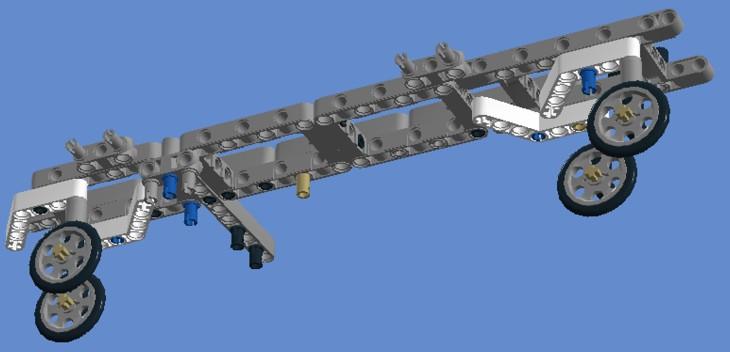
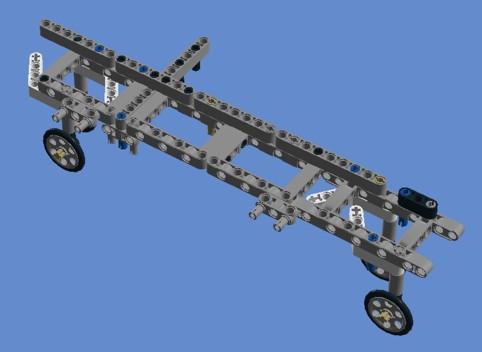
Fig 6.
CAD representations of the front module of the robot (without the belt that loops around the two black wheels.)
Brick module and Sensor module
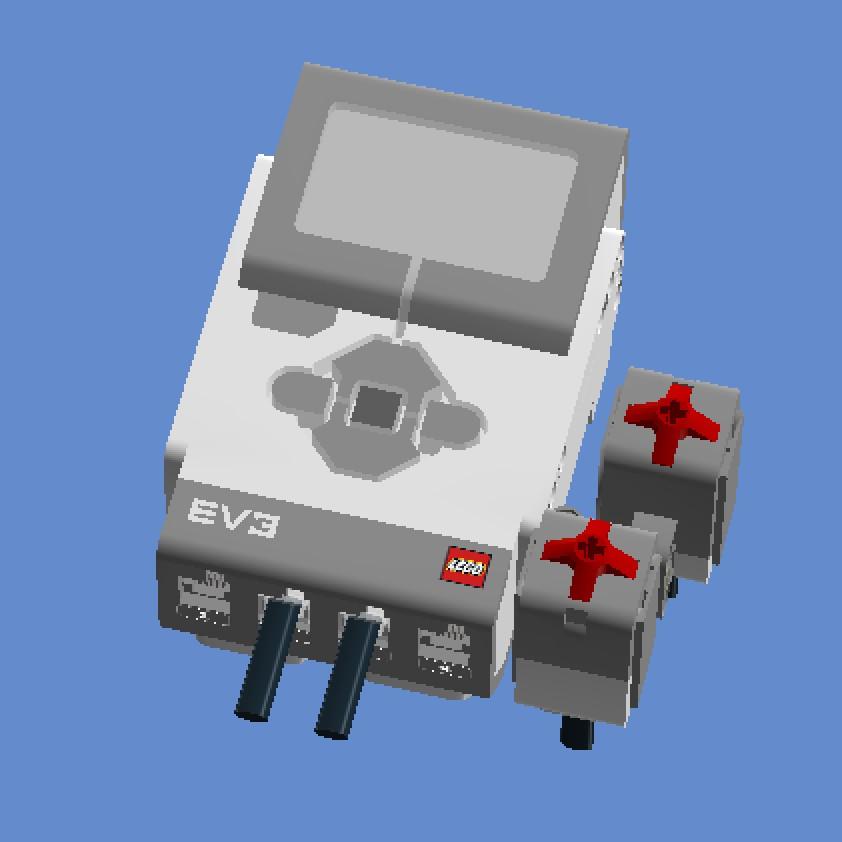
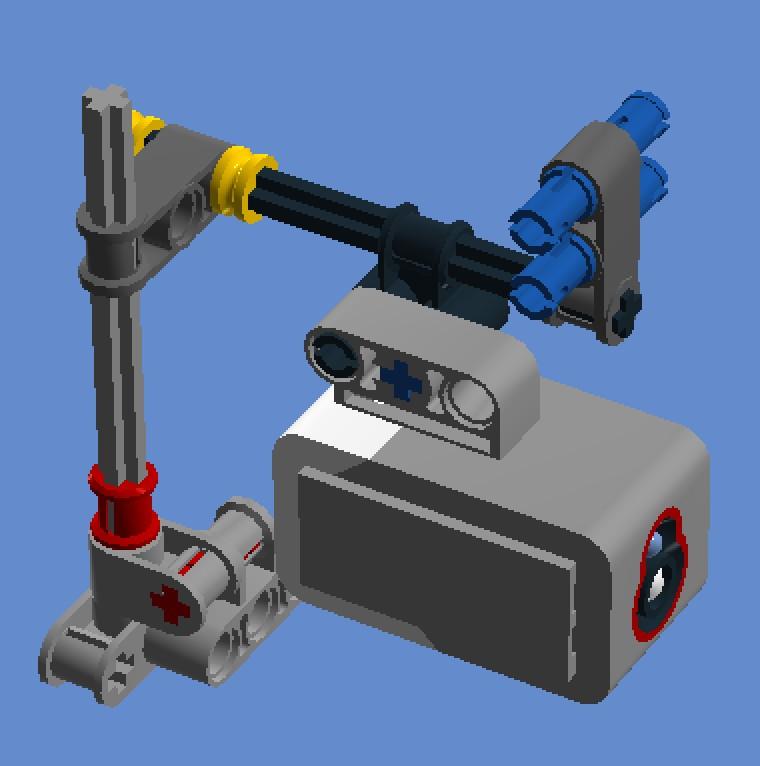
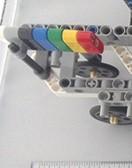
Fig 9.
CAD representations of the control brick (left) and sensor modules (middle).
Gears module
By adding some gear wheels to the robot, the trolley could be operated manually by turning a crank. This also transfers mechanical knowledge to the user.
|
|
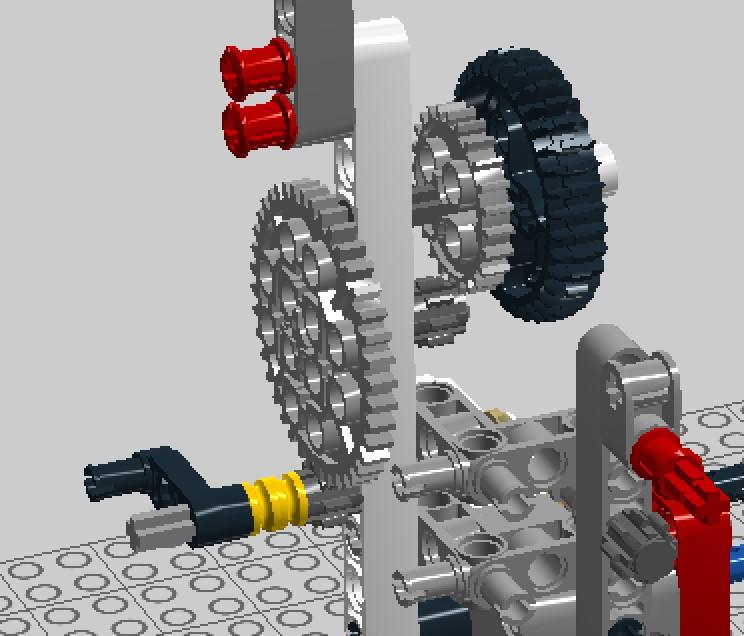
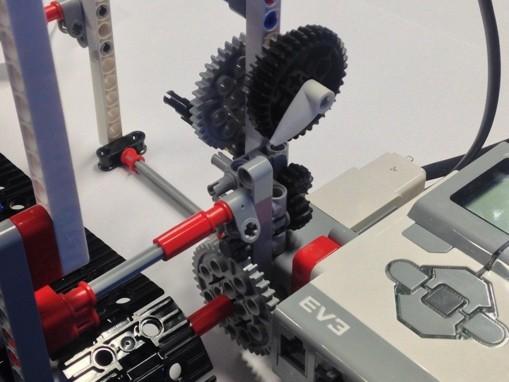
Fig 10.
Gears module to manually move the trolley.
Experiments with robot
In the following we provide detailed instructions and Python code for all experiments of the worksheets so that teachers can reproduce them. The robot is programmed with the Python programming language. The program must be uploaded via USB, Bluetooth, or WiFi.
Manual control of the robot
The file manual_control.py allows controlling all three motors by the push of a button on the brick and with the two touch sensors. This was used for the manual hand pipetting. The buttons move the piston, left/right buttons on the brick move the trolley, and up/down moves the pipette head. Each speed and direction can be individually adjusted.
#!/usr/bin/env python3

from ev3dev.ev3 import \*

from time import sleep

# mount motors

motor_trolley = MediumMotor('outA')

motor_pipette = LargeMotor('outB')

motor_syringe = LargeMotor('outC')

# Button

btn = Button()

# Connect TWO touch sensors to BOTH sensor ports 2 and 3

ts2 = TouchSensor('in2')

ts3 = TouchSensor('in3')

# What to do when state of any button changes:

def left(state):

  if state:

  # move trolley left

    motor_trolley.run_to_rel_pos(position_sp=-20, speed_sp=50, stop_action="coast")

    motor_trolley.wait_while('running')

def right(state):

  if state:

  # move trolley right

    motor_trolley.run_to_rel_pos(position_sp=10, speed_sp=50, stop_action="coast")

    motor_trolley.wait_while('running')

def up(state):

# pipette up

  motor_pipette.run_to_rel_pos(position_sp=-180, speed_sp=100, stop_action="brake")

  motor_pipette.wait_while('running')

def down(state):

  # pipette down

  motor_pipette.run_to_rel_pos(position_sp=180, speed_sp=100, stop_action="brake")

  motor_pipette.wait_while('running')

def enter(state):

  print('Enter button pressed' if state)

def backspace(state):

  print('Backspace button pressed' if state)

  btn.on_left = left

  btn.on_right = right

  btn.on_up = up

  btn.on_down = down

  btn.on_enter = enter

  btn.on_backspace = backspace

  while True: # This loop checks buttons state continuously,

  # calls appropriate event handlers

    btn.process() # Check for currently pressed buttons.

    # If the new state differs from the old state,

    #  call the appropriate button event handlers.

    # sleep(0.01) # buttons state will be checked every 0.01 second

    if ts2.value():

    # syringe fill

      motor_syringe.run_to_rel_pos(position_sp=180, speed_sp=100, stop_action="brake")

      motor_syringe.wait_while('running')

    if ts3.value():

    # syringe eject

      motor_syringe.run_to_rel_pos(position_sp=-180, speed_sp=10, stop_action="brake")

      motor_syringe.wait_while('running')

      # If running this script via SSH, press Ctrl+C to quit

      # if running this script from Brickman, long-press backspace button to quit
Mixing experiment
We use food color mixed with tap water. Typically, 3 drops per 50 ml water gives nice deep colors. Here, 2 loads are transferred each from the blue and the yellow cuvette into a third cuvette. The resulting solution will be green.
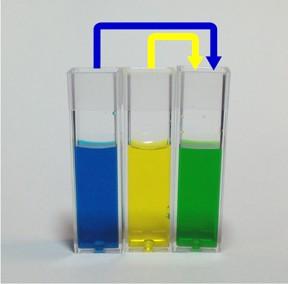
Fig 11.
Color mixing.
#!/usr/bin/env python3

from ev3dev.ev3 import \*

# mount motors

mount-motors
motor_trolley = MediumMotor('outA')
motor_trolley-mediummotorouta

motor_pipette = LargeMotor('outB')
motor_pipette-largemotoroutb

motor_syringe = LargeMotor('outC')
motor_syringe-largemotoroutc

or x in range(0, 2):
for-x-in-range0-2

# pipette down
pipette-down

motor_pipette.run_to_rel_pos(position_sp=180, speed_sp=100, stop_action="brake")
motor_pipette.run_to_rel_posposition_sp180-speed_sp100-stop_actionbrake

motor_pipette.wait_while('running')
motor_pipette.wait_whilerunning

# syringe fill
syringe-fill

motor_syringe.run_to_rel_pos(position_sp=180, speed_sp=100, stop_action="brake")
motor_syringe.run_to_rel_posposition_sp180-speed_sp100-stop_actionbrake

motor_syringe.wait_while('running')
motor_syringe.wait_whilerunning

# pipette up
pipette-up

motor_pipette.run_to_rel_pos(position_sp=-180, speed_sp=100, stop_action="brake")
motor_pipette.run_to_rel_posposition_sp-180-speed_sp100-stop_actionbrake

motor_pipette.wait_while('running')
motor_pipette.wait_whilerunning-1

# move trolley forward
move-trolley-forward

motor_trolley.run_to_rel_pos(position_sp=38, speed_sp=50, stop_action="coast")
motor_trolley.run_to_rel_posposition_sp38-speed_sp50-stop_actioncoast

motor_trolley.wait_while('running')
motor_trolley.wait_whilerunning

# pipette down
pipette-down-1

motor_pipette.run_to_rel_pos(position_sp=180, speed_sp=100, stop_action="brake")
motor_pipette.run_to_rel_posposition_sp180-speed_sp100-stop_actionbrake-1

motor_pipette.wait_while('running')
motor_pipette.wait_whilerunning-2

# syringe eject
syringe-eject

motor_syringe.run_to_rel_pos(position_sp=-180, speed_sp=100, stop_action="brake")
motor_syringe.run_to_rel_posposition_sp-180-speed_sp100-stop_actionbrake

motor_syringe.wait_while('running')
motor_syringe.wait_whilerunning-1

# pipette up
pipette-up-1

motor_pipette.run_to_rel_pos(position_sp=-180, speed_sp=100, stop_action="brake")
motor_pipette.run_to_rel_posposition_sp-180-speed_sp100-stop_actionbrake-1

motor_pipette.wait_while('running')
motor_pipette.wait_whilerunning-3

# move trolley back
move-trolley-back

motor_trolley.run_to_rel_pos(position_sp=-38, speed_sp=50, stop_action="coast")
motor_trolley.run_to_rel_posposition_sp-38-speed_sp50-stop_actioncoast

motor_trolley.wait_while('running')
motor_trolley.wait_whilerunning-1

# move trolley forward
move-trolley-forward-1

motor_trolley.run_to_rel_pos(position_sp=38, speed_sp=50, stop_action="coast")
motor_trolley.run_to_rel_posposition_sp38-speed_sp50-stop_actioncoast-1

motor_trolley.wait_while('running')
motor_trolley.wait_whilerunning-2

# move trolley forward
move-trolley-forward-2

motor_trolley.run_to_rel_pos(position_sp=38, speed_sp=50, stop_action="coast")
motor_trolley.run_to_rel_posposition_sp38-speed_sp50-stop_actioncoast-2

motor_trolley.wait_while('running')
motor_trolley.wait_whilerunning-3

for x in range(0, 2):
for-x-in-range0-2-1

# pipette down
pipette-down-2

motor_pipette.run_to_rel_pos(position_sp=180, speed_sp=100, stop_action="brake")
motor_pipette.run_to_rel_posposition_sp180-speed_sp100-stop_actionbrake-2

motor_pipette.wait_while('running')
motor_pipette.wait_whilerunning-4

# syringe fill
syringe-fill-1

motor_syringe.run_to_rel_pos(position_sp=180, speed_sp=100, stop_action="brake")
motor_syringe.run_to_rel_posposition_sp180-speed_sp100-stop_actionbrake-1

motor_syringe.wait_while('running')
motor_syringe.wait_whilerunning-2

# pipette up
pipette-up-2

motor_pipette.run_to_rel_pos(position_sp=-180, speed_sp=100, stop_action="brake")
motor_pipette.run_to_rel_posposition_sp-180-speed_sp100-stop_actionbrake-2

motor_pipette.wait_while('running')
motor_pipette.wait_whilerunning-5

# move trolley back
ove-trolley-back-1

motor_trolley.run_to_rel_pos(position_sp=-38, speed_sp=50, stop_action="coast")
motor_trolley.run_to_rel_posposition_sp-38-speed_sp50-stop_actioncoast-1

motor_trolley.wait_while('running')
motor_trolley.wait_whilerunning-4

# pipette down
pipette-down-3

motor_pipette.run_to_rel_pos(position_sp=180, speed_sp=100, stop_action="brake")
motor_pipette.run_to_rel_posposition_sp180-speed_sp100-stop_actionbrake-3

motor_pipette.wait_while('running')
motor_pipette.wait_whilerunning-6

# syringe eject
syringe-eject-1

motor_syringe.run_to_rel_pos(position_sp=-180, speed_sp=10, stop_action="brake")
motor_syringe.run_to_rel_posposition_sp-180-speed_sp10-stop_actionbrake

motor_syringe.wait_while('running')
motor_syringe.wait_whilerunning-3

# pipette up
pipette-up-3

motor_pipette.run_to_rel_pos(position_sp=-180, speed_sp=100, stop_action="brake")
motor_pipette.run_to_rel_posposition_sp-180-speed_sp100-stop_actionbrake-3

motor_pipette.wait_while('running')
motor_pipette.wait_whilerunning-7

# move trolley forward
move-trolley-forward-3

motor_trolley.run_to_rel_pos(position_sp=38, speed_sp=50, stop_action="coast")
motor_trolley.run_to_rel_posposition_sp38-speed_sp50-stop_actioncoast-3

motor_trolley.wait_while('running')
motor_trolley.wait_whilerunning-5
Dilution series experiment
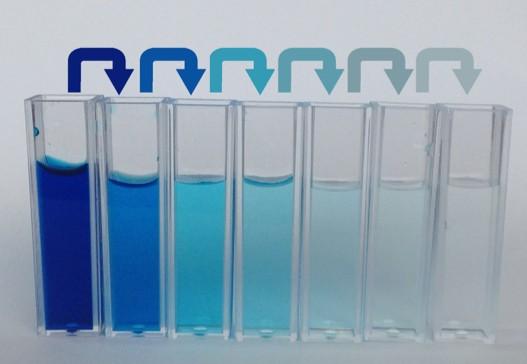
Place a total of 7 empty cuvettes on the ruler. Make sure they stand close together and are aligned with the pipette tip. Fill the left cuvette with your favorite color (here blue) to about 80% full. Fill the other 6 cuvettes with water to about 60% full. Take a full load from the blue cuvette and transfer it into the second cuvette. Then take a load from the second and put it in the third cuvette. Repeat it.
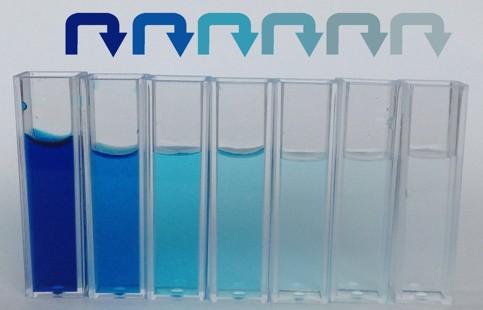
Fig 12.
Dilution series.
#!/usr/bin/env python3

from ev3dev.ev3 import \*

# mount motors

motor_trolley = MediumMotor('outA')

motor_pipette = LargeMotor('outB')

motor_syringe = LargeMotor('outC')

for x in range(0, 5):

  # pipette down

  motor_pipette.run_to_rel_pos(position_sp=180, speed_sp=100, stop_action="brake")

  motor_pipette.wait_while('running')

  # syringe fill

  motor_syringe.run_to_rel_pos(position_sp=180, speed_sp=100, stop_action="brake")

  motor_syringe.wait_while('running')

  # pipette up

  motor_pipette.run_to_rel_pos(position_sp=-180, speed_sp=100, stop_action="brake")

  motor_pipette.wait_while('running')

  # move trolley

  motor_trolley.run_to_rel_pos(position_sp=-38, speed_sp=50, stop_action="coast")

  motor_trolley.wait_while('running')

  # syringe eject

  motor_syringe.run_to_rel_pos(position_sp=-180, speed_sp=100, stop_action="brake")

  motor_syringe.wait_while('running')
Color readout
Color and concentration readout are a bit tricky. The sensor must be placed as close as possible in front of a full cuvette. For best readouts, a white paper can be placed directly on the other side of the cuvette. The values (best choose reflected light) can be readout in the software or on the brick directly. After finding the RGB values, the color can be regenerated by a program such as Photoshop.
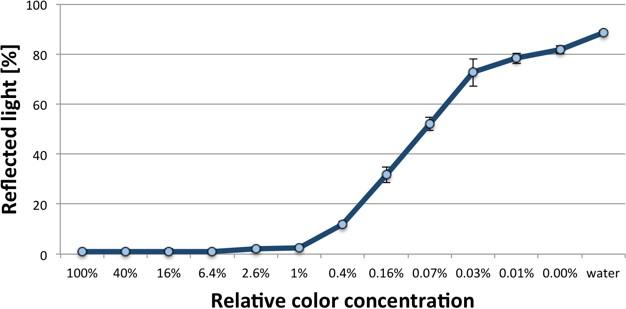
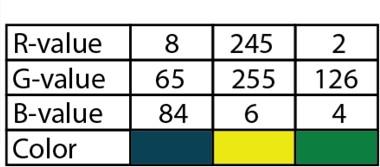
Fig 13.
Color and intensity readouts.
#!/usr/bin/env python3

# so that script can be run from Brickman

from ev3dev.ev3 import \*

from time import sleep

connect EV3 color and touch sensors to any sensor ports

cl = ColorSensor()

# Put the color sensor into RGB mode.

cl.mode='RGB-RAW'

while True: # Stop program by pressing backspace

red = cl.value(0)

green=cl.value(1)

blue=cl.value(2)

print("Red: " + str(red) + ", Green: " + str(green) + ", Blue: " + str(blue))

sound.speak(red).wait()

Sound.speak(green).wait()

Sound.speak(blue).wait()

sleep(1)

Sound.beep()
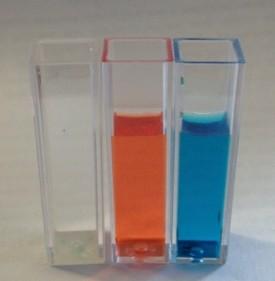
Density layer
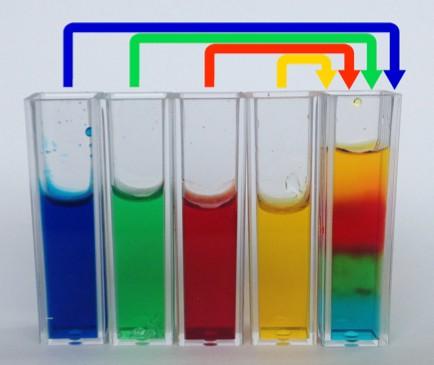
The salt solutions used for the density experiments can be prepared by dissolving18.0 g, 12.0 g, and 5.9 g sodium chloride in 50 ml water to obtain a saturated (100%), 67 % saturated, and 33% saturated solution. Given the salt content, the solutions have different densities and can therefore be stacked on top of each other. Submerging the least dense (yellow, water) with denser solutions is easier as less mixing occurs. The student should pipette the solutions in the order blue, green, red, yellow to obtain the best results. This experiment can be simplified by using only two different densities. In a quiz setting, the students are asked to figure out which solution is denser if they are not told before.
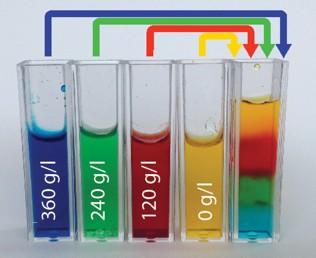
Fig 14.
Salt density layers
#!/usr/bin/env python

from ev3dev.ev3 import \*

# mount motors

motor_trolley = MediumMotor('outA')

motor_pipette = LargeMotor('outB')

motor_syringe = LargeMotor('outC')

i = 4

# pipette down

motor_pipette.run_to_rel_pos(position_sp=180, speed_sp=100, stop_action="brake")

motor_pipette.wait_while('running')

# syringe fill

motor_syringe.run_to_rel_pos(position_sp=180, speed_sp=100, stop_action="brake")

motor_syringe.wait_while('running')

# pipette up

motor_pipette.run_to_rel_pos(position_sp=-180, speed_sp=100, stop_action="brake")

motor_pipette.wait_while('running')

for x in range(0, i):

# move trolley forward

motor_trolley.run_to_rel_pos(position_sp=38, speed_sp=50, stop_action="coast")

motor_trolley.wait_while('running')

i = i - 1

# pipette down

motor_pipette.run_to_rel_pos(position_sp=180, speed_sp=100, stop_action="brake")

motor_pipette.wait_while('running')

# syringe eject

motor_syringe.run_to_rel_pos(position_sp=-180, speed_sp=100, stop_action="brake")

motor_syringe.wait_while('running')

# pipette up

motor_pipette.run_to_rel_pos(position_sp=-180, speed_sp=100, stop_action="brake")

motor_pipette.wait_while('running')

Worksheet 1 – Building + Manual control of robot
Fig.1
Robot overview
Build pipette robot using CAD file
There are five structural modules (1_Pipette, 2_Back, 3_Front, 4_Top, 5_Trolley), the control brick module (6_Brick), and two optional modules (7_Sensor, 8_Gears) that make up the whole robot. You’ll be provided with the following CAD files to construct these parts separately.
CAD files:
0_all_in_one.lxf
1_Pipette.lxf
3_Front.lxf
4_Top.lxf
5_Trolley.lxf
6_Brick.lxf
7_Sensor.lxf
8_Gears_(with_2_Back).lxf
Open each CAD file with the Lego Digital Designer (LDD) software and switch to building mode (F7) to build robot modules by following the step-by-step instructions. The CAD file 0_all_in_one.lxf contains the whole robot. This file gives an overview and shows how the different pieces come together.
P.S. There is also a html version of the building guide, if you haven’t installed the LDD software.
Add the syringe to the pipette head and the cuvettes to the ruler.
To combine the syringe with the Lego part, a red Lego peg included in the kit can be glued to a syringe plunger. Cuvettes can be mounted on the robot via double-side tape on the ruler. Steps to be followed are shown in the following two figures.
Fig 2.
To attach the syringe’s plunger to the robot, cut off the top of the plunger, insert it into the red Lego piece and apply some instant glue. Cut away some of the plastic holding piece of the syringe’s tube in order to fit it into the robot. Cuvettes can be easily placed onto a ruler using double-sided tape.
Fig 3.
Prepared syringe with super glued red Lego piece and cut holder.
B-C) Insert syringe while the green piece is temporarily removed. Then reinstall the green piece to lock the syringe in place.
Double-sided carpet tape on a plastic ruler allows securely placement of up to 20 cuvettes. Cuvettes can be replaced many times and even small liquid spills do not affect the tape’s performance critically.
A color sensor mounted behind the cuvettes allows for reading concentration and colors. F) Gears allow us to manually move the trolley over a crank.
Boot the Lego smart brick with (ev3dev) operating system.
Insert into the EV3 brick the readymade EV3Dev SD card, which your teacher will give to you.
Set the communication between the Lego brick and the computer
Set up the network connection between the PC and the brick, as described here. You may also set up a graphical SSH connection between the EV3 and the PC, as described here.
Develop a Python program to control the robot manually.
You have to develop a Python program that allows controlling all three motors by the buttons on the brick and with two touch sensors. In particular, two buttons will move the piston/syringe (1 button fast, 1 button slow), left/right buttons on the brick will move the trolley, and up/down buttons will move the pipette head.
Check if your robot is working properly
Can you move the trolley left/right? ☐YES ☐NO
Can you lift/lower the pipette head? ☐YES ☐NO
Can you fill/empty the syringe? ☐YES ☐NO
Worksheet 2 – Experiments
Experiment A: Manual operation – color mixing:
- Place 3 cuvettes on the trolley. Make sure they are aligned with
the pipette tip: They should be just below the pipette tip.
Pick two colors and fill them into two cuvettes. About 80% full.
What colors did you pick?
Answer:
Use your program for manually mixing the two liquids in the third cuvette.
What color resulted after you mixed them together?
Answer:
Experiment B: Manual operation – Dilution series
Fill one cuvette with colored water 75% full.
Fill tap water into 6 more cuvettes 75% full.
Dip pipette tip into the colored water.
Fill the syringe by pressing the touch button.
Move tip to second cuvette and empty syringe by pressing the button.
Fill/empty twice to mix the solution.
Repeat in series to obtain something similar to the picture below.
Dilution series result
Now program the robot with Python code to do all the dilution series work completely automated with a preprogrammed sequence.
Speed, direction and degrees turned have to be adjusted.
What is the dilution factor from one cuvette to the next cuvette?
Answer:
What is the dilution factor from the first to the last cuvette?
Answer:
Write the color intensity of the top right cuvette.
Answer:
Color and concentration readout are a bit tricky. The color sensor must be placed as close as possible in front of a full cuvette. For best readouts, a white paper can be placed directly on the other side of the cuvette. The values (reflected light) can be readout in the software.
Experiment C: Density layers – Manual control
The teacher will give you 4 colored solutions with different salt content.
Which of the solutions will be the densest and therefore sink to the bottom?
high salt content, ☐ medium salt content, or ☐ low/no salt
Use your first program to manually transfer two solutions into a third well.
Do a 1st test by manually trying to layer blue and green.
Try to put in blue first. Then put green under it. Does it work? ☐Yes ☐No
Try to put in blue first and then put green on top. Does it work? ☐Yes ☐No
Try to put in green first. Then put blue under it. Does it work? ☐Yes ☐No
Try to put in green first and then put blue on top. Does it work? ☐Yes ☐No
1: blue vs. green
Top: _____________
Bottom: _____________
2: blue vs. red
Top: _____________
Bottom:_____________
3: green vs. red
Top: _____________
Bottom: _____________
4: green vs. yellow
Top: _____________
Bottom: _____________
After tests 1-4: can you tell in what order the colors form stable layers if you add all four into one cuvette?
Top: _____________
Second: _____________
Third: _____________
Bottom: _____________
Try to layer the 4 solutions so they stay separated.
Tip: Try a different order of pipetting.
Tip: Try different speeds of ejection.
Tip: Try bottom-up vs. top-down.
Density layer results
Call the teacher to check if your layers look good.
What was your strategy so the liquids mixed the least?
Answer: _____________
Final questions
Why do the fluids mix sometimes and sometimes not?
Answer: _____________
What floats best in water: ☐ A gold bar, ☐ block of wood, or ☐ a human swimmer?
What floats worst?
Why?
Answer: _____________
Where is it easier to float: in a lake, the pacific, or the Dead Sea?
Lake ☐Pacific ☐Dead Sea Explain your choice.
Answer: _____________
Useful tips
Dry-mode
Before you start with any liquids inside the syringe and cuvettes, you should make sure that your robots operate correctly in “dry-mode”.
Filling the syringe
To fill the syringe completely, you can always use a 180° turn from the empty position.
Release liquid
To release liquid, you can turn any degree from 1°-180° to release the desired amount. Please note that not every degree results in the same amount released! This is due to the theoretical issue that the motor rotates at a constant speed that is translated to a non-linear speed of the plunger (sinusoidal behavior) as well as practical issues such as trapped air inside the syringe which leads to a delayed release due to the air’s compressibility. Also, different syringes and syringe tips have an influence on the amount of liquid released per degree turned.
Therefore it is recommended to measure and calibrate the syringe code to your needs. In general it is safer to release liquids slower than taking them up.
Move the trolley
To find the right distance that the trolley has to move from one to the next cuvette, you can align the pipette tip over one cuvette and manually move to the next cuvette. The integrated sensor shows you how far you have travelled. This is the amount you can use to automatically travel from one cuvette to the next.
Color sensor
To use the color sensor to read out concentrations as shown below, you must place the sensor in the right place in the back of the cuvette. It must be aligned perfectly to make sure that only one cuvette is read. Also make sure to only –
|
|
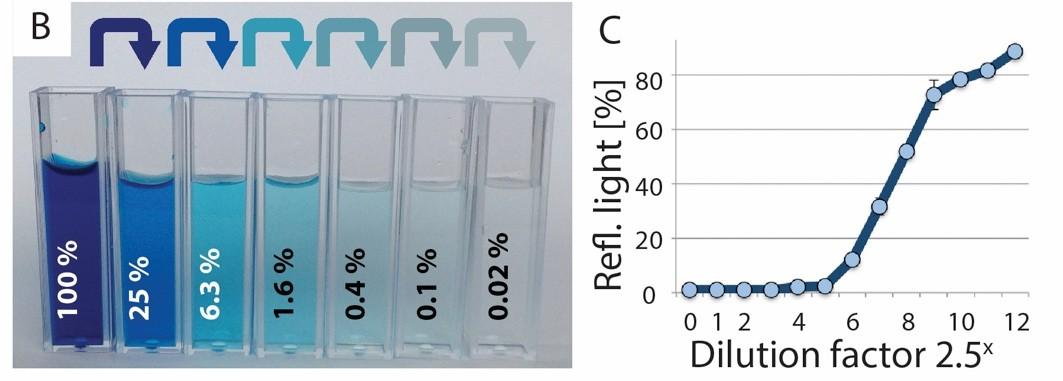
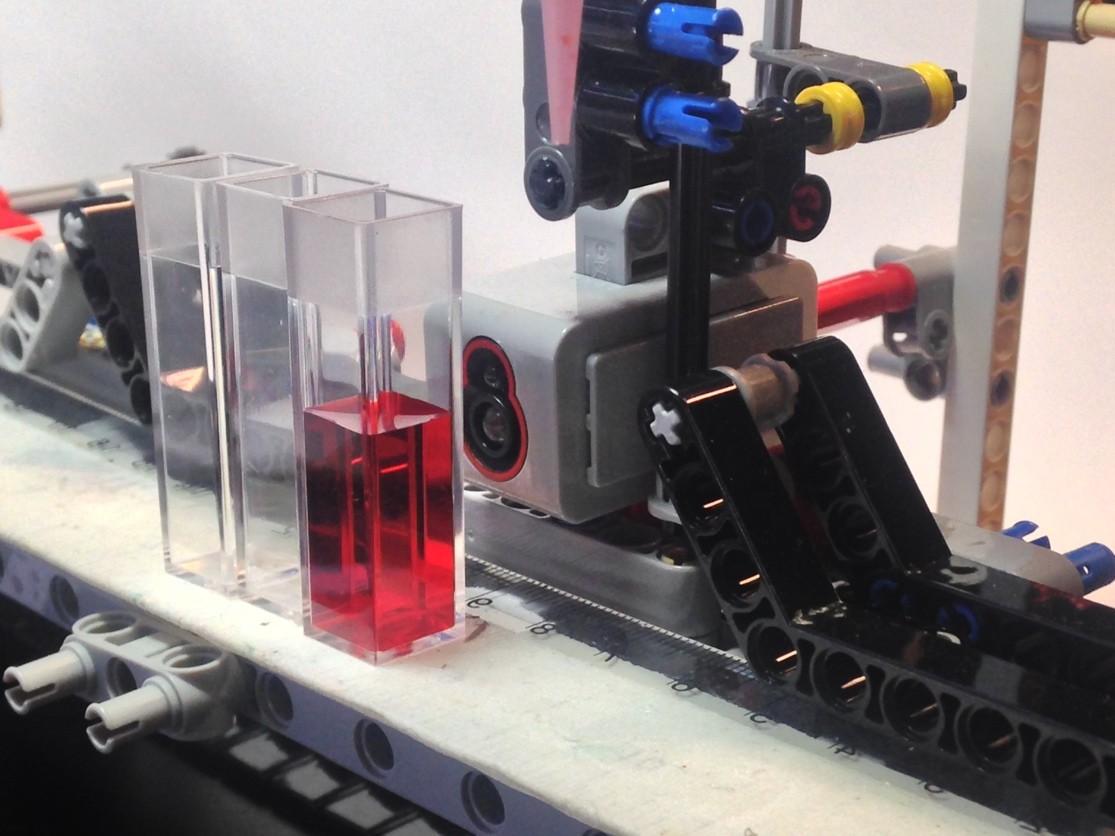
Fig. 4.
Color sensor placement behind a cuvette
Short help on programming
Commands/functions needed for the lesson
React to button presses and releases
In this script’s loop, the highlighted command btn.process() checks for any change in the state of the buttons. If it detects a change then it triggers the corresponding ‘events’. For example, if it detects that the left button has just been pressed then it triggers a ‘left button state change’ event and a ‘button change’ event. It also assigns a value of True to the parameter state if the button is pressed and a value of False if the button is released. Event handlers respond to the events. For example, if the left button is pressed then the ‘left button state change’ event will trigger the highlighted on_left event handler which will call the function ‘left’ (the function does not have to have this name).
#!/usr/bin/env python3

from ev3dev.ev3 import \*

from time import sleep

btn = Button()

# Do something when state of any button changes:


def left(state):

    if state:

        print('Left button pressed')

    else:

        print('Left button released')


def right(state):  # neater use of 'if' follows:

    print('Right button pressed' if state else 'Right button released')


def up(state):

    print('Up button pressed' if state else 'Up button released')


def down(state):

    print('Down button pressed' if state else 'Down button released')


def enter(state):

    print('Enter button pressed' if state else 'Enter button released')


def backspace(state):

    print('Backspace button pressed' if state else 'Backspace button released')


btn.on_left = left

btn.on_right = right

btn.on_up = up

btn.on_down = down

btn.on_enter = enter

btn.on_backspace = backspace

while True:  # This loop checks buttons state continuously,

             # calls appropriate event handlers

    btn.process() # Check for currently pressed buttons.

    # If the new state differs from the old state,

    # call the appropriate button event handlers.

    sleep(0.01)  # buttons state will be checked every 0.01 second

# If running this script via SSH, press Ctrl+C to quit

# if running this script from Brickman, long-press backspace button to quit
Using Motors
In EV3 Python you set the target speed by setting a value for speed_sp or ‘speed setpoint’. For the EV3 motors, speed_sp is in degrees per second so if you set speed_sp to 360 the motor will try to rotate 360° per second or one rotation per second. For the standard EV3 large motors, a speed_sp value of 1000 (degrees per second) is roughly equivalent to a power value of 100 in the standard Lego EV3 software (EV3-G). Therefore with the large motors you should always use speed_sp values in the range -1000 to +1000. In fact I recommend that you use values in the range -900 to +900 with the large motors because they may not be capable of accurately achieving speeds higher than that.
With the standard EV3 medium **motor it should be safe to use values of speed_sp up to**1400 **but **it is very convenient to assume that the maximum advisable value is 1000so that the medium motor can be considered to behave just like the large motor.
Note that speed_sp represents the TARGET speed in degrees per second but motors are of course subject to the laws of physics so the real speed may sometimes not correspond to the requested speed. For example, if you run this code mB.run_timed(time_sp=600, speed_sp=600) then you might expect the motor to turn 0.6s*600°/s=360°=1 rotation but in reality it will turn significantly less (maybe 15% less) because the inertia of the motor stops the motor from reaching its target speed instantly and therefore for a short period at the beginning of the motion the motor turns less fast than requested.
When *low *values of speed_sp are used the movements can again differ from what was requested but in this case the motor tends to move *faster *than requested, for reasons that are not yet well understood. For example, when using speed_sp=100 the motor may turn about 23% faster than requested.
For the official motor documentation click HERE.
You may want to make one or more motors turn at a given speed
through a given angle or number of rotations
for a given time
‘forever’ (until the motor is stopped by a stop() command later during program execution)
Turn motor through a given angle
Use run_to_rel_pos(position_sp=<angle in degrees>, speed_sp=<value>). If you want the motor to run backwards then use a negative value for position_sp rather than for speed_sp. Using a negative value for speed_sp will not work because the sign of speed_sp is ignored by this command (but not by others). Use speed_sp values between 0 and 1000 and try to avoid using values above 900 since your motor may not be able to deliver the requested speed above 900.
Example
To make a large motor on port B turn through 360° at speed 900 and optionally apply a ‘hold’ (like a strong brake - see later):
#!/usr/bin/env python3

# so that script can be run from Brickman

from ev3dev.ev3 import *

from time import sleep

m = LargeMotor('outB')

m.run_to_rel_pos(position_sp=360, speed_sp=900, stop_action="hold")

sleep(5)   # Give the motor time to move
Run motor for a given time
Use run_timed(time_sp=<time in milliseconds>, speed_sp=<value>)
Note that any negative sign for time_sp is ignored.
Example
This example runs a large motor attached to port B backwards for 3 seconds with a ‘speed setpoint’ set to -750 (equivalent to a power setting of -75 in the standard EV3 software). It will work even if a second large motor is also plugged in to another motor port, since the port letter is specified. Without the last line, the program would end as soon as the motor starts to turn, so you probably wouldn’t see it move at all. Waiting for 5 seconds (1+4) ensures that the motor can turn for 3 seconds before the program ends.
#!/usr/bin/env python3

# So program can be run from Brickman

from ev3dev.ev3 import *

from time import sleep

m = LargeMotor('outB')

m.run_timed(time_sp=3000, speed_sp=-750)

print("set speed (speed_sp) = " + str(m.speed_sp))

sleep(1)  # it takes a moment for the motor to start moving

print("actual speed = " + str(m.speed))

sleep(4)
The above example prints the value of speed_sp to the terminal window, or console. I’ve used a ‘+’ operator to concatenate (join) the text string on the left with the speed_sp value on the right, but the speed_sp value is an integer so I had to convert it to a text string with the str()function before the concatenation could take place. I think it is reasonable for newbies to use the ‘+’ operator in this way, but there is another method which is often preferred by more advanced Python programmers - see this discussion and this page. Note as you run the above program that the print statement is run as soon as the motor STARTS to move - the program does not wait until the motor has finished moving before running the next command.
The example also gives a value (m.speed) for the actual speed of the motor, one second after the motor was told to start turning. The one second delay is needed because it takes a moment for the motor to get going - without the delay the actual speed would probably be given as zero because the motor would not yet have begun turning.
Interestingly, the above program also works if the third line is changed to
m = Motor(‘outB’)
but does not work (with a large motor still attached to port B) if this line is used:
m = MediumMotor(‘outB’)
Plug a touch sensor into any sensor port
ts = TouchSensor()
Here ts is the name we choose to use for the sensor. You can use any name you wish. This command will search the ports for a Touch Sensor and save its location if it finds one. You will get an error if it doesn’t find one. If you have more than one and want to specify: ts = TouchSensor(‘in1’) Reading the Touch Sensor
ts.value()
This function will return a numeric value. Since this is a touch sensor, there are only two possible values: 0 tells you the button is not currently pushed, 1 tells you the button is pushed.
Plug an color sensor into any sensor port
cl = ColorSensor()
Here cl is the name we choose to use for the sensor.
Set the color sensor in reflect mode.
# Sensor operation mode - reflected light
cl.mode = ‘COL-REFLECT’
In this mode the color sensor emits light.
Reading the Color Sensor
cl.value()
This function will return a numeric value between 0 and 100 which represents the reflected light intensity.
EV3 color sensor in COL-COLOR mode
When the EV3 color sensor is in COL-COLOR mode it tries to recognize the color of standard Lego bricks placed about 5-6mm in front of the sensor (the distance is critical) and returns a corresponding integer value between 0 (unknown) and 7 (brown). The program below reads the integer once per second, converts it into the corresponding text string using a tuple and displays the string in the console. Press the touch sensor button for at least a second to stop the program.
To make the program speak the colors as well as displaying their text strings, uncomment the line highlighted in blue. This will slightly increase the time between measurements as it includes a wait() function to ensure that the speech was not interrupted.
#!/usr/bin/env python3

# so that script can be run from Brickman

from ev3dev.ev3 import *

from time   import sleep

# Connect EV3 color and touch sensors to any sensor ports

cl = ColorSensor()

ts = TouchSensor()

# Put the color sensor into COL-COLOR mode.

cl.mode='COL-COLOR'

colors=('unknown','black','blue','green','yellow','red','white','brown')

while not ts.value():    # Stop program by pressing touch sensor button

  print(colors[cl.value()])

  #Sound.speak(colors[cl.value()]).wait()

  sleep(1)

  Sound.beep()
If-statement
#!/usr/bin/env python3

if <condition1>:

  <commands1>

elif <condition2>:

  <commands2>

  …………………

else:

  <commandsN>
We can put as many elif as we want.
elif and else parts are optional
Loop (while-statement)
#!/usr/bin/env python3

while <condition1>:

  <commands>
The loop ends when the condition becomes false. If it is false from the beginning there is no execution of the <commands>
Loop (for-statement)
#!/usr/bin/env python3

for x in range(0, 3):

  print x
This loop prints numbers from 0 to 2.
User-Defined Procedures
A Function is a series of Python statements begins by a def, followed by the function name and enclosed in parenthesis. A Function may or may not return a value. A Function procedure can take arguments (constants, variables, or expressions that are passed by a calling procedure). If a Function procedure has no arguments, its def statement should include an empty set of parentheses (). Parameters can also be defined within the parenthesis. The parenthesis are followed by a colon (:) to end the first line.
The end of the function is marked by the loss of whitespace in the next line of the code (ending the code block). It is common practice to use a return statement followed by the argument to return a value. You may also finish a function with a return statement and a simple colon (;).
In the following example, the Celsius def calculates degrees Celsius from degrees Fahrenheit. When the def is called from the ConvertTemp def procedure, a variable containing the argument value is passed to the def. The result of the calculation is returned to the calling procedure and displayed in a message box.
#!/usr/bin/env python3

def Celsius(fDegrees):

  _Celsius = (fDegrees - 32) * 5 / 9

return _Celsius;

# Use this code to call the Celsius function

temp = raw_input("Please enter the temperature in degrees F.", 1)

MsgBox "The temperature is " & Celsius(temp) & " degrees C."