Lego EV3 Robotics, Math and Music
Subject Area(s): Math, Physics, Music, Programming, Robotics
Group Size 3-4
Grade Level 8-11
This lesson plan is an exploration into the programming and mathematical world of music. Students will learn about the mathematics relationship between pitch (note), frequency and period, as well as the way of calculation of fret spacing for stringed instruments. Students will then apply their knowledge by constructing and programming Lego EV3 based musical instruments for playing music.
Prerequisite
This activity can be used for many different levels, but ideally students must have a very basic level of algebra and programming skills. They need to be able to apply formulas and to program with loops and conditionals.
Time constraints: 4-5 hrs
Preparing For This Tutorial:
Materials
Lego EV3 kit, 1 kit per each group
Computers with Audacity program installed. This is a free program available at: http://audacity.sourceforge.net/
Relevant worksheets: The Periods and Frequencies of Sound, Periods and Frequencies Practice, Guitar Fret Spacing, Lego Robotics and Music Project, Compose Music with a Lego
LEGO MODELS:
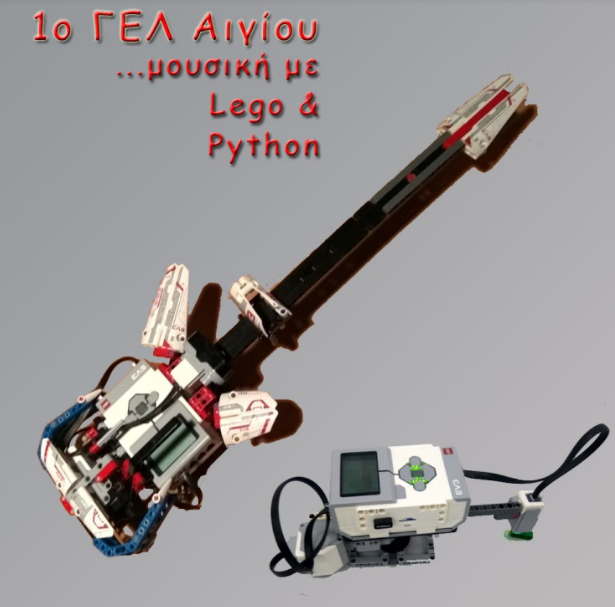
Build a Lego guitar following the instructions here (this model is made by Daniele Benedettelli).
Build Your Lego Music Sequencer. The music sequencer is a really simple build. You’ll construct a base with a motor to rotate an arm, and mount at the arm the EV3 Color sensor where it can detect the color of Lego brick. Then you’ll hook up the EV3 brick for the brain. Just follow the following instructions of Damien Kee model.
https://www.damienkee.com/storage/EV3_Sequencer_build.pdf
Effects
In this lesson, students will:
Learn to record sounds in Audacity and calculate the period and frequency of those sounds.
Explore the relationship between period, frequency and note.
Apply mathematical concepts of stringed instrument by interpreting, explaining, solving and using an equation for calculating fret spacing when given a specific scale length of a stringed instrument.
Apply mathematical knowledge of the above as well as python programming abilities (if then else, sound handling) to program precisely pitched Lego emulated musical instruments like a small piano, a guitar and a musical sequencer.
Exercises
Exercises are contained in the worksheets:
Introduction to Sound and Audacity (in O1 module).
The Periods and Frequencies of Sound.
Periods and Frequencies Practice.
Guitar Fret Spacing.
Lego Robotics and Music Project.
Compose Music with a Lego Sound Sequencer Project.
Example solution
This is a suggested lesson plan. The material can be cut down or expanded as the user wants.
We propose part I and part II to be realized only if the teacher feels that his/her students miss basic music notions, like notes, frequencies, periods and their relationship.
Part I - Audacity, Periods, and Frequencies
KEY IDEAS FOR PART I:
The definition of the period and frequency of a sound
How to measure the period of a sound using Audacity
The equation that relates frequency and period:
SET-UP:
- Have a computer ready with Audacity that can be displayed to show
students the process or print out the directions in Appendix A
- Split students into groups that they will be in the duration of the
unit.
Each group needs to have access to a computer.
- Print out copies of the worksheets: **The Periods and Frequencies of
Sound** and Periods and Frequencies Practice
PROCEDURE
Set-up the activities for the day with a quick discussion on sound. Make sure students understand that sound is created by vibrations in the air. When we record sounds, it’s these vibrations that we are keeping track of.
Introduce students to Audacity. Make sure they have their own program set to the right settings. (See Appendix A for how to use Audacity)
Record a steady tone on Audacity. You can use your voice to do this - make sure you keep the pitch steady and record the sound for long enough.
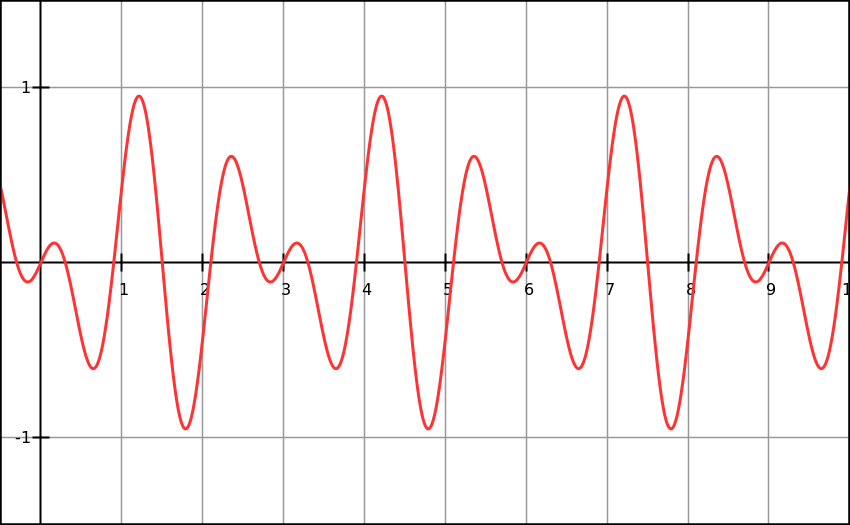
Zoom in on the recorded sound so that students can see the sound wave. Ask them questions about the graph: What does the x-axis represent? (Time.); what do you notice about the shape of the graph? (The graph forms a repeating pattern). They may ask about the y-axis - this represents air pressure.
Introduce two definitions:
Period: The amount of time it takes for a sound wave to repeat one cycle of its pattern.
At this point you can refer back to Audacity and teach students how to calculate the period of a sound they make.
Frequency: The number of repetitions of a sound wave’s pattern per second.
Have students think together to come up with the equation for frequency. ii. The equation for this is
\(\frac{1}{\text{Period}} = Frequency\)
The unit for frequency is Hertz (Hz).
Distribute the worksheet, The Periods and Frequencies of Sound. Students should understand the following actions in Audacity before they are set loose on the exploration:
Use ”record” and ”stop” buttons to record on Audacity
Using the zoom function and the mouse, calculate how long it takes for the sound wave to complete 10 periods.
Divide this time by 10 to get the actual period (d) Use the formula :math:``\(\frac{1}{\text{Period}} = Frequency\ \ \ \ \ \ \ \ \ \ \ \ \ \ \ \ to\ get\ the\ frequency\)
After students have completed problem 1 on the worksheet, go through the procedure as a class to make sure everyone is on the same page.
After students have completed 2 (3 is just for fun and those who go faster), bring the class back together and talk about the results. Some correct observations are the following:
The larger the frequency, the higher the pitch.
The smaller the frequency, the lower the pitch.
The smaller the period, the higher the pitch.
The larger the period, the lower the pitch.
Assign the homework Periods and Frequencies Practice.
Part II - Frequency, Note Ratios, and Guitar Fret Spacing
KEY IDEAS FOR PART II:
If you multiply the frequency of a note by 2, you will get the note one octave higher.
if you multiply the frequency of a note by 3, you will get the note that is an octave and a fifth higher.
Guitar Fret Spacing follows the following equation
\(X_{n} = L(1 - \frac{1}{r^{n}}\))
where\(X_{n}\) the distance of the fret n to the string nut at the end of the fretboard, \(n\) the current fret being calculated, \(L\) is the scale length and \(r = 2^{1/12}\).
SET-UP:
Have a signal generator set up to produce pitches. You can use online pitch generators. Ideally a pitch generator that comes with a slider so you can continuously change the frequency without typing numbers in. Here are some free online tone generators:
http://plasticity.szynalski.com/tone-generator.htm - this is a continuous slider tone generator. It works only on Firefox.
http://onlinetonegenerator.com/ - This does not have a continuous slider, but it is easy to use and reliable.
You need two different sources of pitches (this could mean two computers, or simply two windows open with the tone generators).
PROCEDURE
Go over the previous day’s homework, Periods and Frequencies Practice. The answers are:
(a)Period = 2, Frequency = 1/2 (b)Period = 3, Frequency = 1/3
Period = \(\frac{1}{250}\) = .004
Period = \(\frac{1}{1247}\) = 0.000802
The sound is too low for human ears to hear.
The first activity of the day will be to get the concept of the ratios between the frequencies of different notes.
Play an A 440 on one of your available pitch generators (tuning fork, computer, or other). Now use your second pitch generator (ideally one with a way to ”slide” the frequency without typing in numbers). Set this one to A 440 also and start sliding the frequency higher. Ask students to raise their hands when the pitch sounds the same again - when you’ve reached the note precisely one octave higher (this should happen at 880 Hz, though some may think it happens at 660 Hz, since this is the perfect fifth). Stop on that frequency.
Ask students what they notice about the two frequencies that are playing. (The higher frequency is twice the lower frequency.)
Now ask students to talk in groups to try and figure out the following: What will be the frequency if you go up one more octave? (They will likely come back with two different answers: 1320 Hz or 1760 Hz) Test the conjectures with your equipment. The correct answer is 1760 Hz.
Print and give to the students a diagram similar to the following:
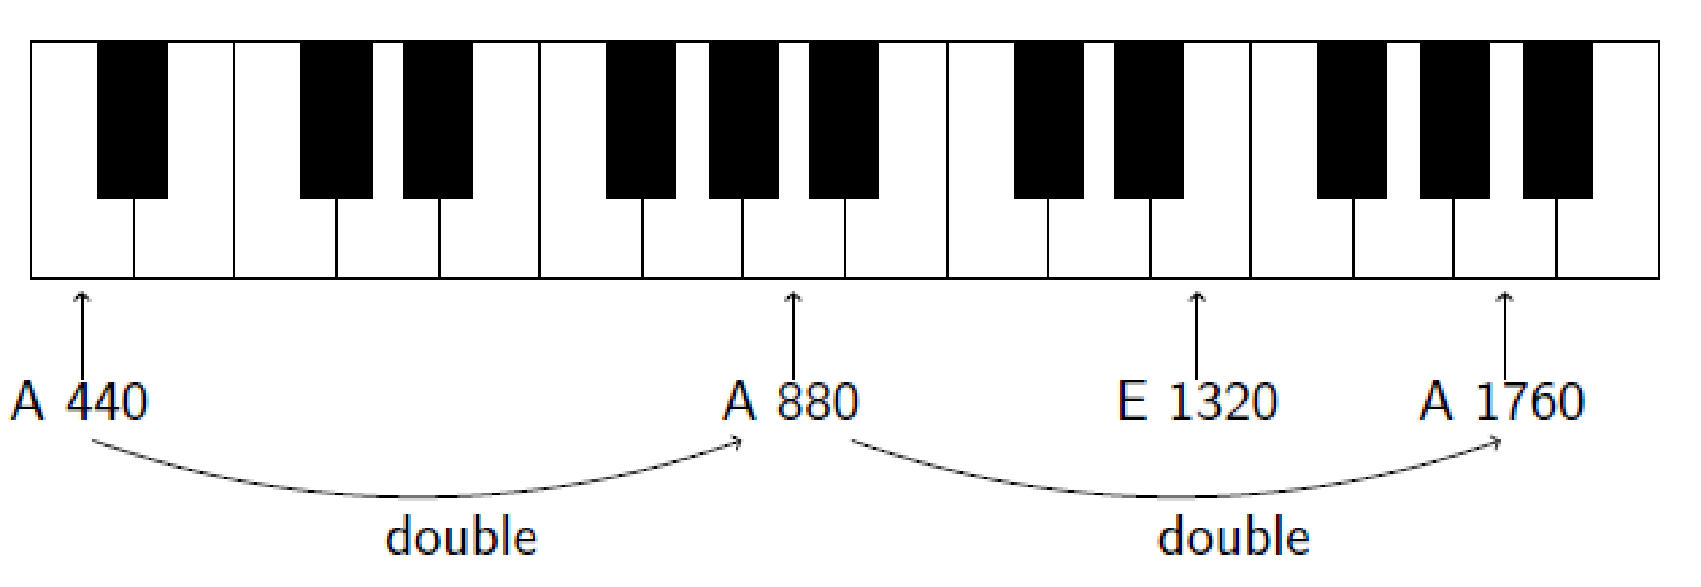
You can note that 1320 Hz is actually the E between A 880 and A 1760.
Ask groups to figure out in pairs the following: What is the frequency of the E between A 440 and A 880? (They can most easily get the answer by dividing 1320 by 2, so the answer is 660 Hz. There are other methods.)
The second activity is to get the concept of how guitar fret spaces are determined.
Talk to students about frets: A guitar has all of its frets located in the proper place along the neck such that the instrument plays in tune in all positions. Throughout history, specific spacing for each fret of a stringed instrument necessitates a precise measurement based on the exact scale length of the individual instrument. Pythagoras was the first known person to experiment with musical scalar intervals near 500 BC. Later, in the 16th century, Galileo’s father, Vincenzo Galilei, was credited with developing the “Rule of 18,” used for centuries by instrument makers to determine the fret scale length of their instruments. For any given vibrating string length they would simply divide the length of the string by 18, yielding the distance from the nut to the first fret. By subtracting that figure from the original string length they arrived at a new shorter scale measurement, which was then divided once again by 18 and resulted in the distance between the first and second frets. They continued in this manner until the entire scale was determined. Over the years the constant divisor 18 has been refined to 17.817 (derived from a formula based on 21/12, or the 12th root of 2) resulting in more accurate scales.
Assign students the worksheet Guitar Fret Spacing for homework.
Part III
Constructing and Programming a Small Piano, a Guitar and a Musical Sequencer with Lego EV3 and Python
KEY IDEAS FOR PART III
Apply the knowledge from parts I and II into almost real working experience through Lego construction of a small piano, a guitar and a musical sequencer.
SET-UP
Have available for each group: a Lego EV3 kit.
PROCEDURE
Go over the homework. Answers are:
1.1. Fret Position #1 = 1.431”, Fret Position #2 = 2.782”, Fret Position #3 = 4.057”, Fret Position #4 = 5.261”, Fret Position #5 = 6.397”
A - Pythagoras
True
B - The twelfth root of 2
True
True
Scale length
Fret position
Distance from nut to current fret position
Distance from nut to previous fret position
Constant for calculating fret position
True
After you have gone through the homework, introduce the project. Hand out first the Make Music - Happy Birthday Song sheet, then the Lego Robotics and Music Project sheet and finally the Compose Music with a Lego Sound Sequencer Project sheet. There are a few things that should be emphasized when introducing the project:
Groups should work independently from other groups and there needs to be cooperation within groups.
Students are graded mainly on their documentation of work. If they don’t have documentation, but have a well-made Lego instrument, they won’t get a very good grade.
Students are intended to experiment with the instruments. The teacher is not going to provide the answer. They need to rely on their knowledge of the math and programming to create and program the instrument.
You can decide how much in class time students require for the project. 4-5 class periods is likely appropriate. Upon completion of the project, hold a performance where groups can demonstrate their instrument. Teachers can get an idea of the Python code that implements the above at the solution sections at the end of this document.
Name: ___________Date: _______
The Periods and Frequencies of Sound
Using your voice, make a musical sound (it must be steady and long enough). Measure how long it takes for the sound wave to complete ten periods. Determine the period, then the frequency of this sound, using that information.
Record 2-3 different pitches (high, low, middle). Calculate the periods and frequencies of these sounds.
Make three mathematically relevant observations about the periods and frequencies of these sounds.
How do the sounds you made account for the different frequencies?
Make and record a sound whose graph is not periodic.
Name: _____________Date: _______
Periods and Frequencies Practice
Determine the period and frequency of the waves in the following graphs: (a)

Period =
Frequency =
Period =
Frequency =
A sound has the frequency of 250 Hz. What is the period of this sound?
You hit a tuning fork that produces a sound with frequency 1247 Hz. What is the period of the sound produced by the tuning fork?
You have another tuning fork (different from in problem 3) that vibrates 3 times a second (so has a frequency of 3 Hz). You can’t hear this sound - why do you think this is?
Name: ____________Date: _________
Guitar Fret Spacing
You have a guitar that has length 25.5-inch. Determine the first 5 fret locations.
Who is the first known person to experiment with determining scalar intervals for stringed instruments (Scale Lengths)?
Pythagoras
Galileo
Les Paul
Eddie Van Halen
None of these
Vincenzo Galilei was credited with developing the “Rule of 18” in the 16th century.
True -or- False
The formula for calculating fret spacing is derived from the “Rule of 18” and which of the following?
The quadratic formula
The twelfth root of 2
The Pythagorean theorem
Pi
All of these
A guitar’s scale length can be calculated by measuring the distance from the front edge of the nut to the center of the 12th fret, then doubling that measurement.
True -or- False
One of the most common scale lengths for electric guitars is Fender’s 25-1/2” scale.
True -or- False
Match each symbol in the fret calculation formula Dn = [(L – Dn-1) ÷ 17.817] + Dn-1 with what it represents from the options below
L |
a.Constant for calculating fret position |
n |
b.Distance from nut to previous fret position |
Dn |
c.Distance from nut to current fret position |
Dn-1 |
d.Scale length |
17.817 |
e.Fret position |
A guitar with a shorter scale length has a lower string tension than a guitar with a longer scale length if both are tuned to the same pitch.
True -or- False
Name:______________Date:_______
Lego Robotics and Music Instrument - Project
Practice
This is a project that is more about process than product. You are responsible for documenting your trials and errors in making your Lego instruments.
The Project: You and your partner are responsible for creating and programming in Python a Lego EV3 based piano and guitar that produce at least five different pitches.
Load the EV3Dev Operating System on each Lego smart brick with the readymade EV3Dev SD card, which is given to you by the teacher.
Set the communication between the Lego brick and the computer: It is not mandatory to set up a network between PC and Lego but it will help to upload the program. Set up the network connection between the EV3 and the brick, as described
Set up a graphical SSH connection between the EV3 and the PC, as described
Turn EV3 smart brick into a small piano with 5 notes so that it can play different notes, as shown in this video. Necessary Python commands can be found below in Appendix D. Your code must be put on Google Docs and shared with your teacher.
Make a Python music program for playing the “Happy Birthday” song with a Lego EV3 smart brick. Instructions to follow are given in Appendix B. Your code must be put on Google Docs and shared with your teacher.
Build a Lego guitar following the instructions here (this model is made by Daniele Benedettelli). Of course you can use your imagination for building another model.
Read and try to understand the meaning of the readymade Python program given in Appendix C. Write your thoughts about the functionality of the program on Google Drive and share them with your teachers. Test the program to verify your thoughts. For help, look at the Appendix D, in which you may find a list of the most useful Python instructions.
Make the following changes that will make your guitar to look and function more realistically.
Watch this interactive video (First create a student account in Edpuzzle platform with your details and join PROBOT class with code that your teacher will give you).The neck of the guitar is divided into 7 frets (for the 8 notes of octave). But actually, as you watched in video, the neck should be divided into 13 frets because there are also the sharp (#) notes. So, make the appropriate changes for that. [tip: 2 changes are needed: add the rest notes and add more elif statements].
In the readymade code, each note is given a specific tone (Hz). But (according to the video above) each note has the frequency of the previous one multiplied by \(\sqrt[12]{2}\). Instead of giving just a number for every frequency, use this information.
Give some visual effects at the guitar. The smart brick has 2 LEDs which can have 5 different colors. Select a random color for each note.
If you are not very familiar with guitar, you may need to know where each note is on the arm of the guitar. So, change the Lego beams of the upper row of the arm with colorful ones. Use a different color for each note if this is possible.
You may have noticed that there is also a medium motor plugged in guitar which is not used. Try to think of a way to make it useful.
All of your answers must be put on Google Drive and shared with your teachers.
You may also check the tuning of your guitar by going to http://onlinetonegenerator.com/ and plugging in the frequency you believe your guitar is producing.
Note Schemes
There are a number of different scales in music! Here are some five note scales. Use these schemes for your guitar or piano, or create your own!
Blues Scale = A, C, D, D#, E (This is used in Jazz)
Pentatonic Scale = A, B, D, E, F# (used in a lot of traditional music all around the world)
Table of Notes and Frequencies
Note |
Frequency |
|---|---|
A |
440 |
A# |
466 |
B |
494 |
C |
523 |
C# |
554 |
D |
587 |
D# |
622 |
E |
659 |
F |
698 |
F# |
740 |
G |
784 |
G# |
830 |
A |
880 |
If you would like to use other pitches, use the ratio to figure out their frequencies.
Name:_____________Date:_______
Compose Music with a Lego Sound Sequencer Project
In this project you’ll make a simple step sequencer that uses colored Lego bricks to put sounds into a sequence that makes up a little song. You’ll use only a single EV3 Color sensor, but that sensor can detect 8 different colors.
Lego colored blocks are placed at the end of the sequencer arm, and as each block passes the color sensor, the sound that corresponds with that color is played. The variety of sounds and sequences is endless.
The Lego Sequencer will use the Lego Mindstorms EV3 Intelligent Brick as a processor to do 3 things: control the motor that spins the arm, receive the data from the EV3 Color Sensor, then play the sounds. Of course you can match your preferred sound notes to different colors so that you create your own beats.
Build Your Lego Music Sequencer
The music sequencer is a really simple build. You’ll construct a base with a motor to rotate an arm, and mount at the arm the EV3 Color sensor where it can detect the color of Lego brick. Then you’ll hook up the EV3 brick for the brain. Just follow the following instructions of Damien Kee model.
https://www.damienkee.com/storage/EV3_Sequencer_build.pdf
Program the EV3 brick - Drop Some Robotronic Beats
Program in Python the Lego Mindstorms EV3 Intelligent Brick as a processor to do 3 things: control the motor that spins the arm, receive the data from the EV3 Color Sensor, then play the sounds.
Options: With the up/down buttons you may control the speed of the spinning arms, and with the middle button you may stop the rotation to allow you to add and remove the colored bricks.
Each color of brick will be recognized by the software as the trigger for one of 5 specific notes of your choice. Just swap, delete, and remix the bricks to rearrange your beats!
Note: You may get lots of false positive triggers, especially at higher speeds, so you have to do a lot of attempts for an acceptable solution.
For short help on Python programming, look at appendix D.
Going Further
Want to use your Sequencer as an input device for amplifiers or for recording? The EV3 brick has no audio out jack. But with its built-in Bluetooth, Wi-Fi and USB, there has got to be a way to get an output other than the speaker.
Grading Rubric
A |
|
B |
|
C |
|
D |
|
F |
|
Appendix A
This is a guide on how to use Audacity to measure the period of a sound.
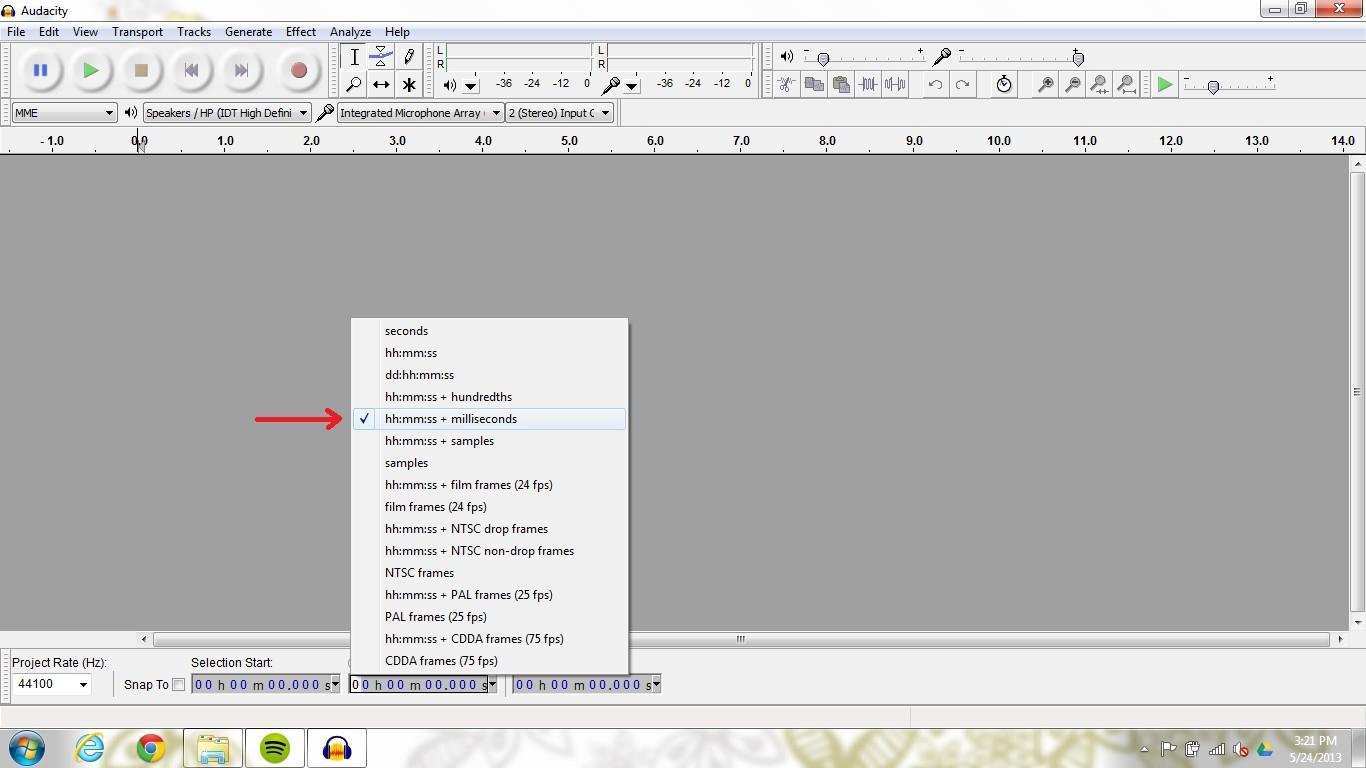
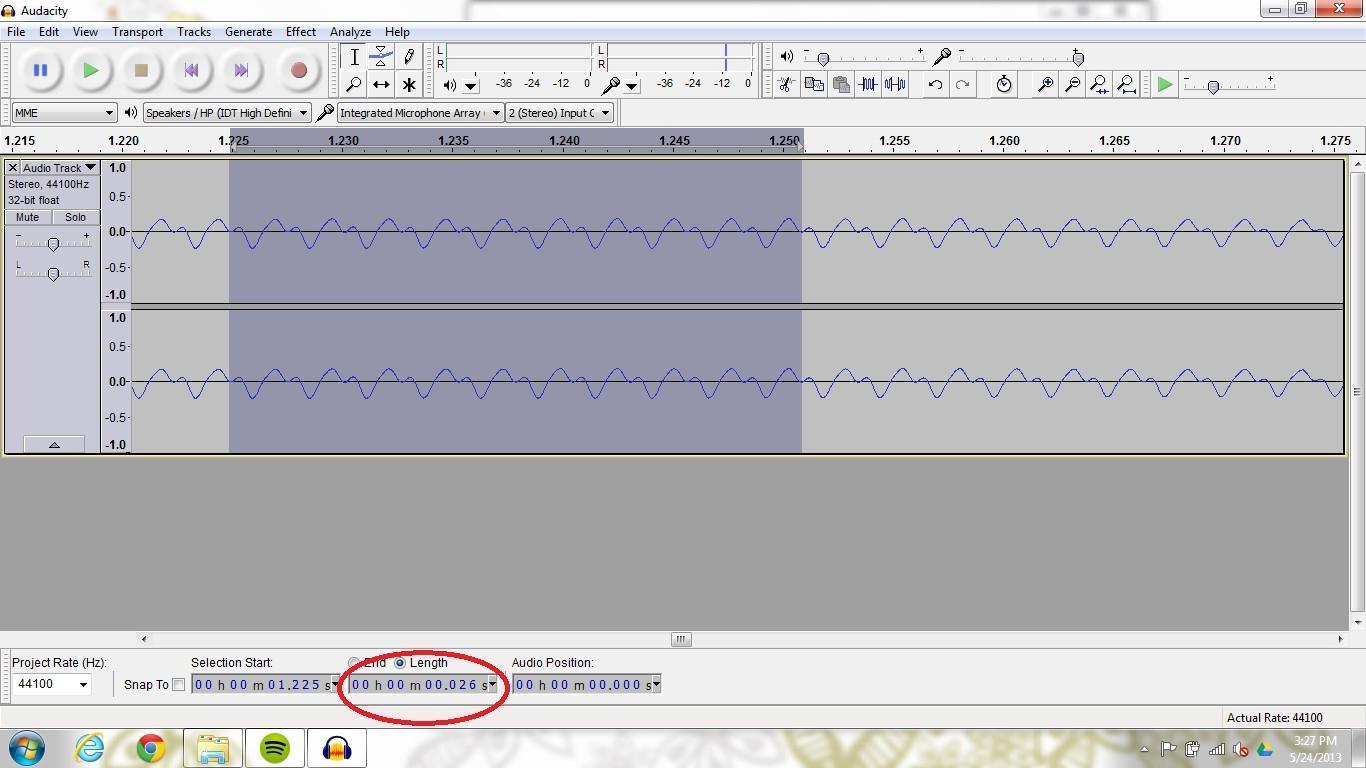
Step 1: Open Audacity and make sure you have the measurement setting on the bottom set to “Length.”
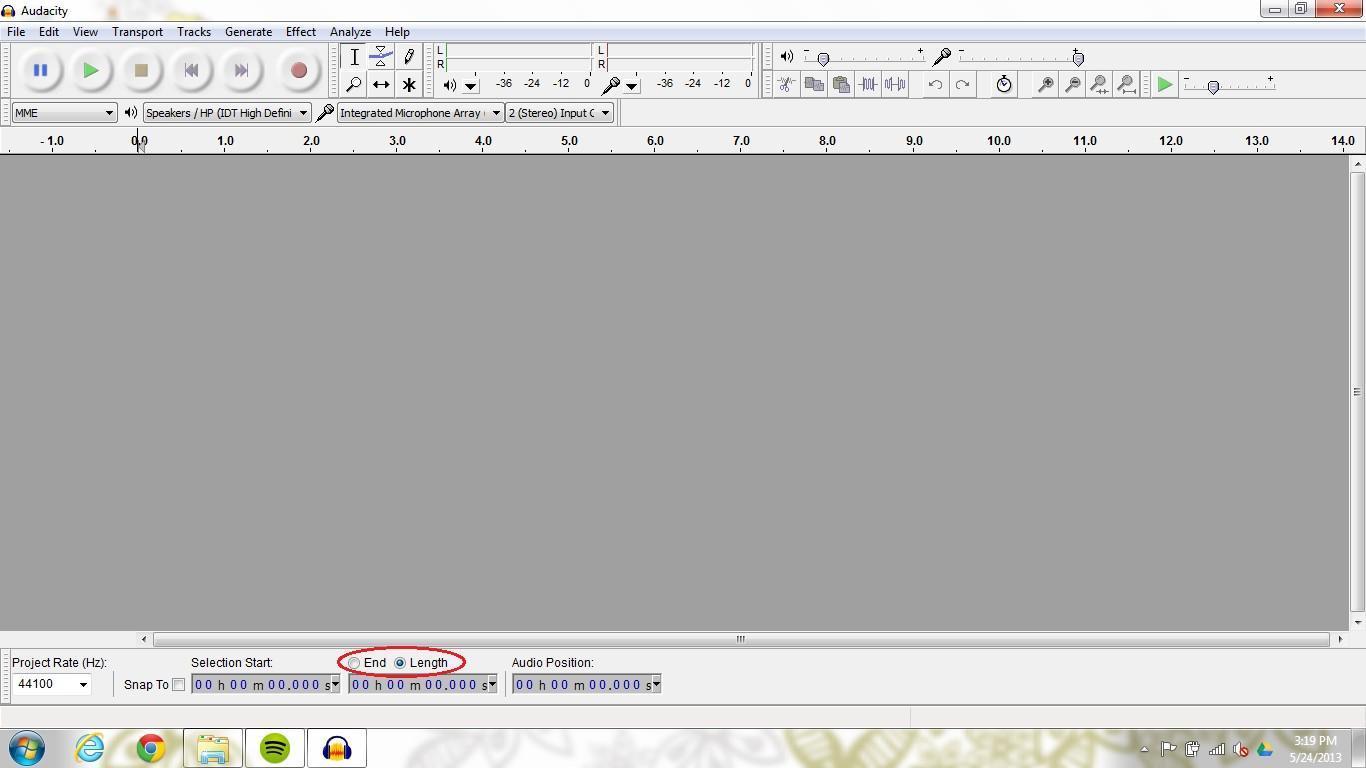
Step 2: Set the measurement units to “hh:mm:ss + milliseconds.”
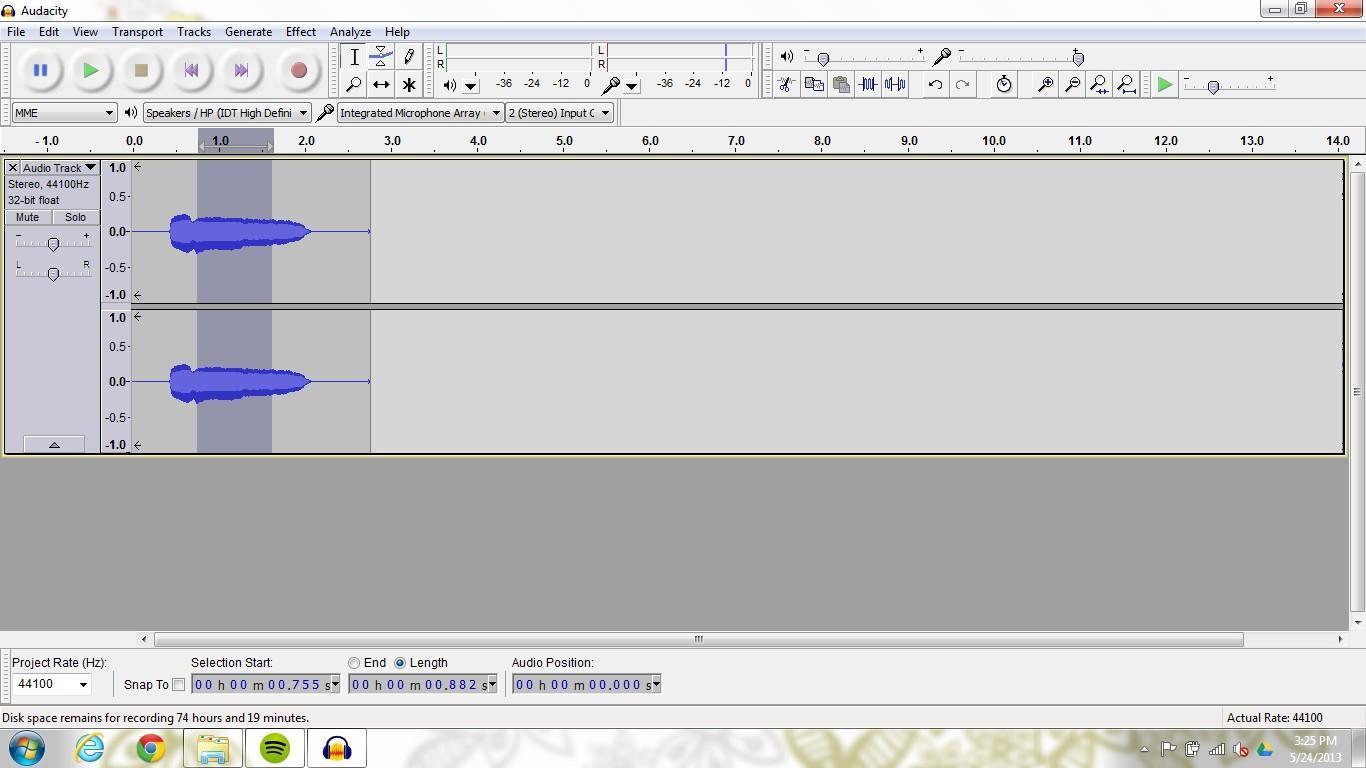
Step 3: Press the record button in the upper left side of the screen. Make a long, steady sound and press the stop button. With your mouse, select the middle of the recorded sound.
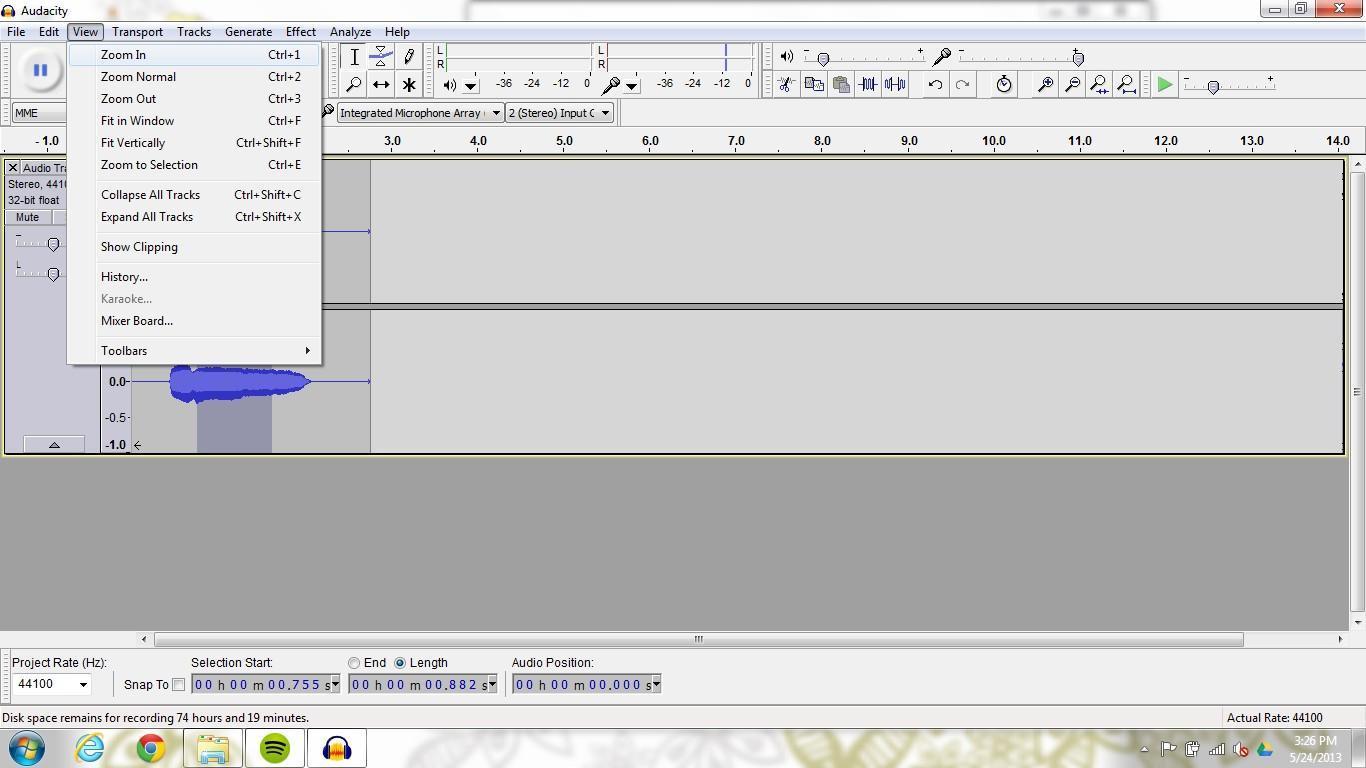
Step 4: Zoom in on the display. You can use the quick keys to do this, press ”Ctrl” and ”1.”
Step 5: Zoom in until you can see the specific sound waves.
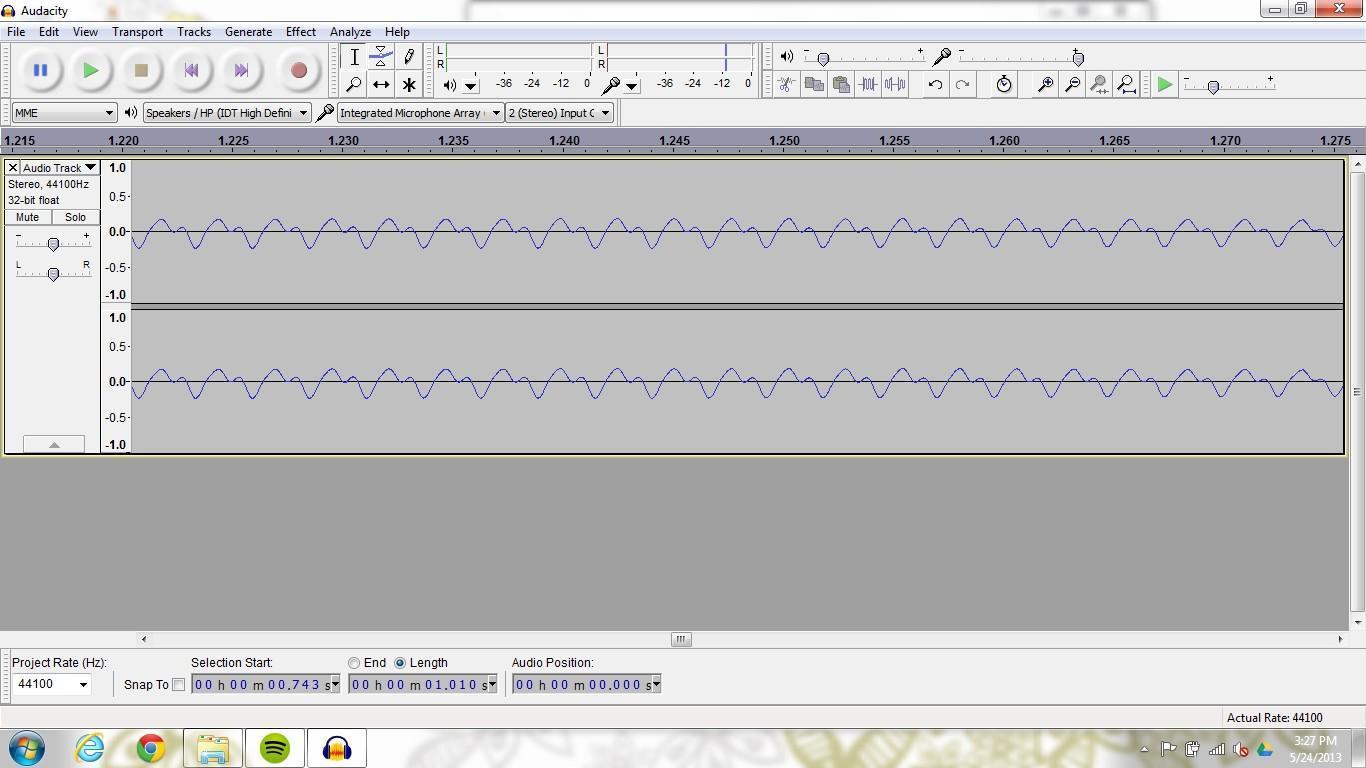
Step 6: With your mouse, highlight 10 repetitions of the period. Read off the amount of time it took for the sound wave to complete the 10 periods. Then divide this number by 10 to get the actual period.
Appendix B
Make Music - Happy Birthday Song
The two commands you must use when making music are: the Tone command and the Wait command. If you want to program a sophisticated song, you need to use subprograms (functions/procedures) to create the pieces and then link the pieces together. The syntax and semantics of sub-programs and Tone/Wait commands for EV3 Python can be found below in Appendix D.
The Main Program for Happy Birthday in pseudocode is as follows. We use a % to indicate a comment.
#!/usr/bin/env python3

Repeat forever

Sub-program: hbd1 % Happy birthday

Wait 0.6

Sub-program: toyou1 % to you.

Wait 1.2

Sub-program: hbd1 % Happy birthday (same as first one)

Wait 0.6

Sub-program: toyou2 % to you.

Wait 1.2

Sub-program: hbd2 % Happy birthday,

Wait 0.6

Sub-program: hbd3 % happy birthday,

Wait 0.6

Sub-program: hbd4 % happy birthday,

Wait 0.6

Sub-program: toyou3 % to you.

Wait 1.2

Wait 0.6 % Quarter note rest before repeat.

End repeat

The sub-programs \ **hbd1, hbd2, hbd3, hbd4, toyou1,
toyou2,** and **toyou3** are:

Sub-program: hbd1

Tone 526 for 0.2 % Ha-

Wait 0.3

Tone 526 for 0.2 % ppy

Wait 0.3

Tone 587 for 0.5 % birth

Wait 0.6

Tone 526 for 0.5 % day

End of hdb1

Sub-program: toyou1

Tone 699 for 0.5 % to

Wait 0.6

Tone 660 for 1.1 % you.

End of toyou1

Sub-program: toyou2

Tone 785 for 0.5 % to

Wait 0.6

Tone 699 for 1.1 % you.

End of toyou2

Sub-program: hbd2

Tone 526 for 0.2 % Ha-

Wait 0.3

Tone 526 for 0.2 % ppy

Wait 0.3

Tone 1047 for 0.5 % birth

Wait 0.6

Tone 880 for 0.5 % day

End of hdb2

Sub-program: hbd3

Tone 880 for 0.2 % Ha-

Wait 0.3

Tone 880 for 0.2 % ppy

Wait 0.3

Tone 693 for 0.5 % birth

Wait 0.6

Tone 660 for 0.5 % day

End of hdb3

Sub-program: hbd4

Tone 466 for 0.2 % Ha-

Wait 0.3

Tone 466 for 0.2 % ppy

Wait 0.3

Tone 440 for 0.5 % birth

Wait 0.6

Tone 349 for 0.5 % day

End of hdb4

Sub-program: toyou3

Tone 392 for 0.5 % to

Wait 0.6

Tone 349 for 1.1 % you.

End of toyou2
If you want the music faster or slower, scale things appropriately.
Appendix C
Lego Guitar Python Code
#!/usr/bin/env python3

# so that script can be run from Brickman

from ev3dev.ev3 import \*

import ev3dev.ev3 as ev3

from time import sleep

import random

ev3.Sound.speak('Lets rock n roll!').wait()

Leds.set_color(Leds.LEFT, Leds.GREEN)

Leds.set_color(Leds.RIGHT, Leds.GREEN)

m = MediumMotor('outD')

ts = TouchSensor('in1')

IR = InfraredSensor('in4')

btn = Button()

start = False

print('Press Up or Down for long/sort duration of notes')

while not start:

  if btn.up:

    start = True

    dur = 300

  if btn.down:

    start = True

    dur = 150

    Nto = 262 #note D

    Re = 294 #note E

    Mi = 330 #note F

    Fa = 350 #note G

    Sol = 393 #note H

    La = 440 #note A [basic frequency 440Hz]

    Si = 495 #note B

    Nto2 = 524 #note c

  while start:

    d = IR.value()

    x = ts.value()

  if x == 0:

    if d<11:

      Sound.tone(Nto, dur).wait()

    elif d<20:

      Sound.tone(Re, dur).wait()

    elif d<29:

      Sound.tone(Mi, dur).wait()

    elif d<38:

      Sound.tone(Fa, dur).wait()

    elif d<47:

      Sound.tone(Sol, dur).wait()

    elif d<56:

      Sound.tone(La, dur).wait()

    elif d<65:

      Sound.tone(Si, dur).wait()

    else:

      Sound.tone(Nto2, dur).wait()
Appendix D
Short help on Python programming
Useful commands needed in this lesson
Connect medium motor to port D
#!/usr/bin/env python3

m = MediumMotor('outD')
Plug a touch sensor into any sensor port
#!/usr/bin/env python3

ts = TouchSensor()
Here ts is the name we choose to use for the sensor. You can use any name you wish. This command will search the ports for a Touch Sensor and save its location if it finds one. You will get an error if it doesn’t find one. If you have more than one and want to specify:
#!/usr/bin/env python3

ts = TouchSensor('in1')
Reading the Touch Sensor
#!/usr/bin/env python3

ts.value()
This function will return a numeric value. Since this is a touch sensor, there are only two possible values: 0 tells you the button is not currently pushed, 1 tells you the button is pushed.
You could have the Touch Sensor and Large Motor interact using the following simple program.
Plug an infrared sensor into any sensor port
#!/usr/bin/env python3

IR = InfraredSensor()
Here IR is the name we choose to use for the sensor.
Reading the distance of the IR sensor
#!/usr/bin/env python3

d = IR.value()
The distance is in cm.
EV3 color sensor in COL-COLOR mode
When the EV3 color sensor is in COL-COLOR mode it tries to recognize the color of standard Lego bricks placed about 5-6mm in front of the sensor (the distance is critical) and returns a corresponding integer value between 0 (unknown) and 7 (brown). The program below reads the integer once per second, converts it into the corresponding text string using a tuple and displays the string in the console. Press the touch sensor button for at least a second to stop the program.
To make the program speak the colors as well as displaying their text strings, uncomment the line highlighted in blue. This will slightly increase the time between measurements as it includes a wait() function to ensure that the speech was not interrupted.
#!/usr/bin/env python3

# so that script can be run from Brickman

from ev3dev.ev3 import \*

from time   import sleep

# Connect EV3 color and touch sensors to any sensor ports

cl = ColorSensor()

ts = TouchSensor()

# Put the color sensor into COL-COLOR mode.

cl.mode='COL-COLOR'

colors=('unknown','black','blue','green','yellow','red','white','brown')

while not ts.value():    # Stop program by pressing touch sensor button

  print(colors[cl.value()])

  #Sound.speak(colors[cl.value()]).wait()

  sleep(1)

Sound.beep()
Setting the two LED colors of the clever brick Leds.set_color(Leds.LEFT, Leds.GREEN)
There are two LEDs [Leds.LEFT or Leds.RIGHT] and five different colors [Leds.GREEN, Leds.RED, Leds.YELLOW, Leds.ORANGE, Leds.AMBER]
If-statement
#!/usr/bin/env pseudocode

if <condition1>:

<commands1>

elif <condition2>:

<commands2>

…………………

else:

<commandsN>
We can put as many elif as we want.
elif and else parts are optional
Loop (while-statement)
#!/usr/bin/env python3

while <condition1>:

  <commands>
The loop ends when the condition becomes false. If it is false from the beginning there is no execution of the <commands>
Random number (random function)
#!/usr/bin/env python3

r = random.randint(0,4)
This command returns in variable r a random number between 0 and 4
Select an element of a list
(Leds.GREEN, Leds.RED, Leds.YELLOW, Leds.ORANGE, Leds.AMBER)[2]
In the example the list contents the 5 LED colors and we selected the 3rd one
Play a SINGLE tone
To play a SINGLE tone of given frequency (Hz) and duration (milliseconds), use
#!/usr/bin/env python3

Sound.tone(\ *frequency, duration*)
Example:
#!/usr/bin/env python3

from ev3dev.ev3 import \*

# Play a SINGLE 1500Hz tone for 2 seconds

# Wait for the tone to finish playing before continuing

**Sound.tone(1500, 2000).wait()**
Play a SEQUENCE of tones
To play a SEQUENCE of tones, use
#!/usr/bin/env python3

Sound.tone(\ *tone_sequence*)
The tone_sequence parameter is a list of tuples, where each tuple contains up to three numbers. You should know by now that a tuple is like a list except that a list can be modified and a tuple cannot. The first number is frequency in Hz, the second is duration in milliseconds, and the third is delay in milliseconds between this and the next tone in the sequence.
#!/usr/bin/env python3

from ev3dev.ev3 import \*  # needed for Sound

# Play a 3000Hz tone for 2 seconds and then wait 0.4 seconds

# before playing the next tone, 800Hz for 1.8 seconds

# followed by a 2 second delay

# Wait for the sequence to finish playing before continuing

**Sound.tone([(3000, 2000, 400),(800, 1800, 2000)]).wait()**
User-Defined Procedures
A Function is a series of Python statements begins by a def, followed by the function name and enclosed in parenthesis. A Function may or may not return a value. A Function procedure can take arguments (constants, variables, or expressions that are passed by a calling procedure). If a Function procedure has no arguments, its def statement should include an empty set of parentheses (). Parameters can also be defined within the parenthesis. The parentheses are followed by a colon (:) to end the first line.
The end of the function is marked by the loss of whitespace in the next line of the code (ending the code block). It is common practice to use a return statement followed by the argument to return a value. You may also finish a function with a return statement and a simple colon (;).
In the following example, the Celsius def calculates degrees Celsius from degrees Fahrenheit. When the def is called from the ConvertTemp def procedure, a variable containing the argument value is passed to the def. The result of the calculation is returned to the calling procedure and displayed in a message box.
#!/usr/bin/env python3

def Celsius (fDegrees):

  _Celsius = (fDegrees - 32) * 5 / 9

return _Celsius;

# Use this code to call the Celsius function*

temp = raw_input("Please enter the temperature in degrees F.", 1)

MsgBox "The temperature is " & Celsius(temp) & " degrees C."
GLOSSARY (from Wikipedia)
Word Definition
Frequency Frequency is the number of occurrences of a repeating event per unit of time. Accidentals Letter names are modified by the accidentals. The sharp sign ♯ raises a note by a semitone or half-step, and a flat ♭ lowers it by the same amount. In modern tuning a half step has a frequency ratio of 12√2, approximately 1.059. The accidentals are written after the note name: so, for example, F♯ represents F-sharp, B♭ is B-flat, and C♮ is C natural (or C). Octave In music, an octave (Latin: octavus: eighth) or perfect octave (sometimes called the diapason) is the interval between one musical pitch and another with half or double its frequency. Pitch Pitch is a perceptual property of sounds that allows their ordering on a frequency-related scale, or more commonly, pitch is the quality that makes it possible to judge sounds as “higher” and “lower” in the sense associated with musical melodies. Robotics Robotics is an interdisciplinary branch of engineering and science that includes mechanical engineering, electronic engineering, information engineering, computer science, and others. Robotics deals with the design, construction, operation, and use of robots, as well as computer systems for their control, sensory feedback, and information processing. IR sensor A passive infrared sensor (PIR sensor) is an electronic sensor that measures infrared (IR) light radiating from objects in its field of view. They are most often used in PIR-based motion detectors.
SOLUTION
Make Music - Happy Birthday Song - “Python code”
#!/usr/bin/env python3

# so that script can be run from Brickman

from ev3dev.ev3 import \*

import ev3dev.ev3 as ev3

from time import sleep

def hdb1():

  ev3.Sound.tone([(526, 200, 100), (526, 200, 100), (587, 500, 100), (526, 500, 100)]).wait()

return;

def toyou1():

  ev3.Sound.tone([(699, 500, 100), (660, 1100, 100)]).wait()

return;

def toyou2():

  ev3.Sound.tone([(785, 500, 100), (699, 1100, 100)]).wait()

return;

def hdb2():

  ev3.Sound.tone([(526, 200, 100), (526, 200, 100), (1047, 500, 100), (880, 500, 100)]).wait()

return;

def hdb3():

  ev3.Sound.tone([(880, 200, 100), (880, 200, 100), (693, 500, 100), (660, 500, 100)]).wait()

return;

def hdb4():

  ev3.Sound.tone([(466, 200, 100), (466, 200, 100), (440, 500, 100), (349, 500, 100)]).wait()

return;

def toyou3():

  ev3.Sound.tone([(392, 500, 100), (349, 1100, 100)]).wait()

return;

btn = Button()

while not btn.any(): # While no (not any) button is pressed.

  hdb1()

  toyou1()

  hdb1()

  toyou2()

  hdb2()

  hdb3()

  hdb4()

  toyou3()

  sleep(0.6)

  .. _solution-1:
SOLUTION
Lego Guitar Python Code Extensions – “python code”
#!/usr/bin/env python3

# so that script can be run from Brickman

from ev3dev.ev3 import \*

import ev3dev.ev3 as ev3

from time import sleep

import random

ev3.Sound.speak('Lets rock n roll!').wait()

Leds.set_color(Leds.LEFT, Leds.GREEN)

Leds.set_color(Leds.RIGHT, Leds.GREEN)

m = MediumMotor('outD')

ts = TouchSensor('in1')

IR = InfraredSensor('in4')

btn = Button()

start = False

print('Press Up or Down for long/sort duration of notes')

while not start:

  if btn.up:

    start = True

    dur = 300

  if btn.down:

    start = True

    dur = 150

    Nto = 262

    Re = 294 # for teachers: Re = round(Nto*(2**(2/12)))

    Mi = 330 # for teachers: Mi = round(Re*(2**(2/12)))

    Fa = 350# for teachers: Fa = round(Mi*(2**(1/12)))

    Sol = 393 # for teachers: Sol = round(Fa*(2**(2/12)))

    La = 441 # for teachers: La = round(Sol*(2**(2/12)))

    Si = 495 # for teachers: Si = round(La*(2**(2/12)))

    Nto2 = 524 # for teachers: Nto2 = round(Si*(2**(1/12)))

  print(Nto, Re, Mi, Fa, Sol, La, Si, Nto2)

  initialMotorLocation= m.position

  while start:

    if btn.left:

      break

    d = IR.value()

    x = ts.value()

    r = random.randint(0,4)

    # d.mode = 'US-DIST-CM'

    #print(x)

    differenceMotorLocation= initialMotorLocation - m.position

    print(differenceMotorLocation)

  if differenceMotorLocation <=5:

    octave_higher=1

  elif differenceMotorLocation <=20:

    octave_higher=2

  elif differenceMotorLocation <=30:

    octave_higher=3

  elif differenceMotorLocation <=40:

    octave_higher=4

  elif differenceMotorLocation <=50:

    octave_higher=5

  elif differenceMotorLocation <=60:

    octave_higher=6

  else:

    octave_higher=7

  if x == 0:

    if d<11:

      Leds.set_color(Leds.LEFT, (Leds.GREEN, Leds.RED, Leds.YELLOW, Leds.ORANGE, Leds.AMBER)[r])

      r = random.randint(0,4)

      Leds.set_color(Leds.RIGHT, (Leds.GREEN, Leds.RED, Leds.YELLOW, Leds.ORANGE, Leds.AMBER)[r])

      n=Nto*octave_higher

    elif d<20:

      Leds.set_color(Leds.LEFT, (Leds.GREEN, Leds.RED, Leds.YELLOW, Leds.ORANGE, Leds.AMBER)[r])

      r = random.randint(0,4)

      Leds.set_color(Leds.RIGHT, (Leds.GREEN, Leds.RED, Leds.YELLOW, Leds.ORANGE, Leds.AMBER)[r])

      n=Re*octave_higher

    elif d<29:

      Leds.set_color(Leds.LEFT, (Leds.GREEN, Leds.RED, Leds.YELLOW, Leds.ORANGE, Leds.AMBER)[r])

      r = random.randint(0,4)

      Leds.set_color(Leds.RIGHT, (Leds.GREEN, Leds.RED, Leds.YELLOW, Leds.ORANGE, Leds.AMBER)[r])

      n=Mi*octave_higher

    elif d<38:

      Leds.set_color(Leds.LEFT, (Leds.GREEN, Leds.RED, Leds.YELLOW, Leds.ORANGE, Leds.AMBER)[r])

      r = random.randint(0,4)

      Leds.set_color(Leds.RIGHT, (Leds.GREEN, Leds.RED, Leds.YELLOW, Leds.ORANGE, Leds.AMBER)[r])

      n=Fa*octave_higher

    elif d<47:

      Leds.set_color(Leds.LEFT, (Leds.GREEN, Leds.RED, Leds.YELLOW, Leds.ORANGE, Leds.AMBER)[r])

      r = random.randint(0,4)

      Leds.set_color(Leds.RIGHT, (Leds.GREEN, Leds.RED, Leds.YELLOW, Leds.ORANGE, Leds.AMBER)[r])

      n=Sol*octave_higher

    elif d<56:

      Leds.set_color(Leds.LEFT, (Leds.GREEN, Leds.RED, Leds.YELLOW, Leds.ORANGE, Leds.AMBER)[r])

      r = random.randint(0,4)

      Leds.set_color(Leds.RIGHT, (Leds.GREEN, Leds.RED, Leds.YELLOW, Leds.ORANGE, Leds.AMBER)[r])

      n=La*octave_higher

    elif d<65:

      Leds.set_color(Leds.LEFT, (Leds.GREEN, Leds.RED, Leds.YELLOW, Leds.ORANGE, Leds.AMBER)[r])

      r = random.randint(0,4)

      Leds.set_color(Leds.RIGHT, (Leds.GREEN, Leds.RED, Leds.YELLOW, Leds.ORANGE, Leds.AMBER)[r])

      n=Si*octave_higher

    else:

      Leds.set_color(Leds.LEFT, (Leds.GREEN, Leds.RED, Leds.YELLOW, Leds.ORANGE, Leds.AMBER)[r])

      r = random.randint(0,4)

      Leds.set_color(Leds.RIGHT, (Leds.GREEN, Leds.RED, Leds.YELLOW, Leds.ORANGE, Leds.AMBER)[r])

      n=Nto2*octave_higher

      Sound.tone(n, dur).wait()

      print(d)

    #sleep(1)
SOLUTION
Musical Sequencer - “Python code”
#!/usr/bin/env python3

# so that script can be run from Brickman

from ev3dev.ev3 import \*

import ev3dev.ev3 as ev3

from time import sleep

import random

ev3.Sound.speak('Lets rock n roll!').wait()

#Leds.set_color(Leds.LEFT, Leds.GREEN)

#ev3.Leds.set_color(Leds.RIGHT, Leds.GREEN)

# note frequencies

Nto = 262 #note D

Re = 294 #note E

Mi = 330 #note F

Fa = 350 #note G

Sol = 393 #note H

La = 440 #note A [basic frequency 440Hz]

Si = 495 #note B

Nto2 = 524 #note c

# duration of notes

dur = 100

# mount motor to outA

motor = ev3.LargeMotor()

# motor speed

motor_speed = 50

# mount color sensor

color = ev3.ColorSensor()

# Put the color sensor into COL-COLOR mode.

color.mode='COL-COLOR'

# tuple of strings of colors

colors=('unknown','black','blue','green','yellow','red','white','brown')

btn = ev3.Button()

motor.run_forever(speed_sp=motor_speed)

while not btn.any(): # While no (not any) button is pressed.

  #cl = color.value()

#print(colors[cl])

#ev3.Sound.speak(colors[cl]).wait()

#sleep(1)

#cl = color.value()

cl = color.color

if cl==1:

  ev3.Sound.tone(Mi, dur)#.wait()

#print(colors[cl])

elif cl==2:

  ev3.Sound.tone(Fa, dur)#.wait()

#print(colors[cl])

elif cl==3:

  ev3.Sound.tone(Sol, dur)#.wait()

#print(colors[cl])

elif cl==4:

  ev3.Sound.tone(La, dur)#.wait()

#print(colors[cl])

elif cl==5:

  ev3.Sound.tone(Si, dur)#.wait()

#print(colors[cl])

motor.stop(stop_action="hold")

sleep(5)

ev3.Sound.beep()