Basic display and LED’s
Prerequisite
What students should know before:
Modulo operator
Time constraints:
starting from 45 min - single lesson
Preparing For This Tutorial:
The LEGO Mindstorm EV3 – only brick.
Effects
Computer science – Students will work with function form Display (Screen) and LEDs classes. Students will create programmes that will allow them to display images files on the robot’s screen, display any text and how to use LEDs.
Mathematics – Students will have the opportunity to see an application of a modulo operator.
Exercise
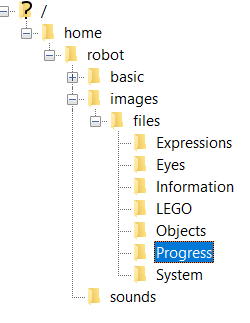
Prepare files.
Note. If you had got installed LEGO SOFTWARE EDUCATION, you could find all LEGO images in BMP format in C:Program Files (x86)LEGO SoftwareLEGO MINDSTORMS Edu EV3ResourcesBrickResourcesEducationImagesfiles
Create a special directory called ‘images’ in your robot’s directory and copy it to BMP files. Keep the structure of subdirectories. (/home/robot/images/files/Eyes).
Create a programme that will
display white text ‘’Python’’ in the upper half of the black screen and dark text ‘’is fun’’ in the lower half of the white screen.
plot a rectangle point by point and it’s diagonal on the brick screen. (Don’t use rectangle nor line method. You could use it in a separate exercise).
display any bmp image from the folder (cover and scale it).
display on the computer screen a list of available fonts. Display on the brick screen the text ‘’Python is fun’’ using luBS font where size is from 08 to 14.
present a possibility of LEDs. LEFT LED displays a different colour than RIGHT. The programme presents at least two times all available colours ‘ORANGE’, ‘BLACK’, ‘AMBER’, ‘RED’, ‘YELLOW’, ‘GREEN’.
display sequentially green, yellow and red colours - use tuples to encode the colour.
Example solution
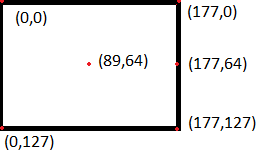
The EV3 has a 178 x 128 pixels monochrome (black and white) LCD. The coordinates of the top-left pixel are (0, 0) and the coordinates of the bottom-right pixel are (177, 127).
Part 1
Computer science
Step 1: Check out this text to create a programme that will display white text ‘’Python’’ in the upper half of the black screen and dark text ’’is fun’’ in the lower half of the white screen.
Program
#!/usr/bin/env python3

from ev3dev.ev3 import \*

from time import sleep

lcd = Screen()

lcd.draw.rectangle((0,64,177,127), fill='black')

lcd.draw.text((32,32),'Python')

lcd.draw.text((32,80),'is fun',fill='white')

lcd.update()

sleep(6)
File here
or using ev3dev2
      #!/usr/bin/env python3

from ev3dev2.display import Display

from time import sleep

lcd = Display()

lcd.draw.rectangle((0,64,177,128), fill='black')

lcd.draw.text((32,32),'Python')

lcd.draw.text((32,80),'is fun',fill='white')

lcd.update()

sleep(6)
File here
Step 2:
Display any bmp image from the folder (cover and scale it).
To plot a diagonal point by point you have to find the ratio of the longer side to the shorter side ( 177/127 =1.39).
Program
      #!/usr/bin/env python3

from ev3dev.ev3 import \*

from time import sleep

#up side

lcd = Screen()

for i in range(0,177):

  lcd.draw.point((i,1))

  lcd.update()

sleep(1)

#left side

for i in range(0,127):

  lcd.draw.point((177,i))

  lcd.update()

sleep(1)

#down side

for i in range(0,177):

  lcd.draw.point((177-i-1,127))

  lcd.update()

sleep(1)

#right side

for i in range(0,127):

  lcd.draw.point((0,127-i))

  lcd.update()

sleep(1)

#diagonal

for i in range(0,177):

  lcd.draw.point((round(i*1.4),i))

  lcd.update()

sleep(6)
File here
Note: In the repository you could find files that use the ev3dev2 library.
Step 3.
Display any bmp image from the folder (cover and scale it)
Program
      #!/usr/bin/env python3

from ev3dev.ev3 import \*

from time import sleep

from PIL import Image # Python Image Library (PIL)

lcd = Screen() # create an instance of the object

im = Image.open('/home/robot/images/files/Eyes/Angry.bmp') #file
handling

lcd.image.paste(im, (0,0))

#point(0,0) - start drow from the upper left corner

lcd.update()

sleep(5)

##lcd = Screen()

##im = Image.open('/home/robot/images/files/Eyes/Angry.bmp')

###out=im.rotate(180) #180-degree rotation

###out=im.resize((30,30)) #resize

##lcd.image.paste(out, (0,0))

##lcd.update()

##sleep(5)
File here
Step 4.
Display a list of available fonts.
Arguments of command
lcd.draw.text((0,0), mystring,font=fonts.load(size))
are:
tuple - coordinates of the upper left corner, displaying the string
string
font - not obligatory – to determine type of fonts. The capital letters in the names of the fonts have the following meanings: B= Bold, I=Italic, O=Oblique R=Regular, S=? (size),
As an example I will use the luRS14 font which is therefore regular, size 14.
      #!/usr/bin/env python3

from ev3dev.ev3 import \*

from ev3dev import \*

from time import sleep

import ev3dev.fonts as fonts

lcd = Screen()

print(fonts.available())

lcd.draw.text((20,20), 'mystring',font=fonts.load('luRS14'))

lcd.update()

sleep(3)
File here
Step 5.
Display the text ’’Python is fun’’ using luBS font where size is from 08 to 14.
      #!/usr/bin/env python3

# aligns text to the centre horizontally.

from ev3dev.ev3 import \*

from ev3dev import \*

from time import sleep

import ev3dev.fonts as fonts

lcd = Screen()

mystring = 'Python is fun'

for i in range(8,16,2):

size='luBS'

if i==8:

  size=size+'0'+str(i)

else:

  size=size+str(i)

  lcd.clear()

  lcd.draw.text((20,20), mystring,font=fonts.load(size))

  lcd.update()

sleep(3)
File here
Part 2
Mathematics
Application of operator modulo.
When we divide a dividend \(a\) by a divisor \(b\), we get a quotient \(q\) with a remainder \(r\). \(a \div b = q\) with a remainder \(r\) where \(0 \leqslant r < b\)If we can find a remainder \(r\), in the expressions above, then we calculate \(a\ mod\ b = r\)
Computer science
EV3 Python controls the left and right LEDs separately. The RED and GREEN colours are the colours of the LEDs. Other colours: orange, amber and yellow are made by blending green and red. In the ev3dev2 library it is possible to obtain a custom colour. Colour is represented by two valued tuple. Tuple (1,0) means RED colour and (0,1) means GREEN colour. When you put (1,1) or (0.5,0.5) you obtain an AMBER colour. Try yourself with any other values (0.3,0.5) etc.
Step 1. Programme presents the possibility of diodes. The LEFT diode displays a different colour than RIGHT. The programme presents at least two times all available colours ‘ORANGE’, ‘BLACK’, ‘AMBER’, ‘RED’, ‘YELLOW’, ‘GREEN’.
      #!/usr/bin/env python3

from ev3dev2.led import Leds

from time import sleep

color=['ORANGE','BLACK','AMBER','RED','YELLOW','GREEN']

my_leds=Leds()

for i in range(0,12):

  my_leds.set_color('LEFT',color[i%5])

  my_leds.set_color('RIGHT',color[(i+1)%5])

sleep(2)

my_leds.all_off()
File here
Step 2.
Programme displays sequentially green, yellow and red colours. Use (0,1), (0.5,0.5) and (1,1) tuples to coding the colours, loop and function mod (%). See the test below for some values variable i.
i |
(i%3) |
(i%3)/2 |
1-((i%3)/2) |
|---|---|---|---|
0 |
0 |
0 |
1 |
1 |
1 |
0.5 |
0.5 |
2 |
2 |
1 |
0 |
6 |
0 |
0 |
1 |
7 |
1 |
0.5 |
0.5 |
8 |
2 |
1 |
0 |
To obtain the solution of the problem, at the end of Exercise 5 add the code presented below.
      #!/usr/bin/env python3

for i in range(0,100):

  my_leds.set_color('LEFT',((i%3)/2,1-(i%3)/2))

  my_leds.set_color('RIGHT',((i%3)/2,1-(i%3)/2))

  print(i)

sleep(4)

my_leds.all_off()