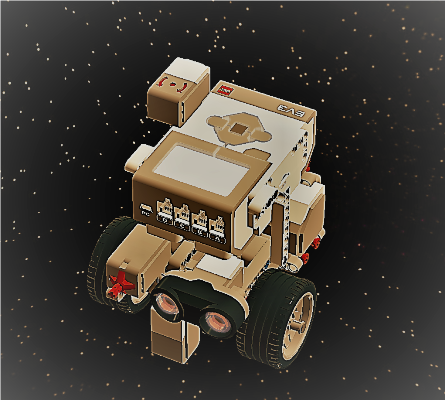
Surveyors Wanted to Explore Mars and its Moons
Have you ever asked the question, what is out there? So have we! That curiosity leads us to explore new places like Mars and its moons, Phobos and Deimos. Just what lies beyond the next valley, canyon, crater, or hill is something we want to discover with rovers and with humans one day too. Your task is to construct a curiosity rover with Lego Mindstorms education Kit and teach it to explore the Mars canyon by programming the robot.
In this three module cycle of project [p]:ROBOT you will learn how to program your own real robot that can move around, react and interact with the world, the basic fundamentals of every robot in the world. You will learn how to use touch sensors to detect objects in the world. You will detect colors and light using the color sensor, making it possible to follow lines, and you will beam out different colors to show the world what mode your robot is in. You will measure distances between objects. By combining all of the above you will at the end of the project have the knowledge to build your own robot to do whatever pleases you, be it world domination or a new cuddly friend to your pet. Moreover you will be shown the correlation between IT (programming) and various branches of mathematics, i.e. mathematical analysis and the geometry. To make this possible you will be using a new generation robotics kit from Lego Mindstorms called EV3, but instead of using the default limited program that ships with it, you will be using programming language Python to program it directly giving you full control over everything.
The aim of the lesson is to show the use of concepts learned during the classes in Python programming if statement and loops.
Preparing For This Tutorial:
The LEGO Mindstorm EV3 Robot that coincides with this tutorial is in file Building_instructions_MOON.pdf.
Setting up in 12 easy steps
Obtain a suitable microSD memory card.
Download the latest Linux Debian Stretch ev3dev image.
Download and install Etcher, a free utility that will allow you to flash the ev3dev image to the microSD card.
Use Etcher to flash the image to the card.
Insert the card into the EV3, boot the EV3, do some minor configuring and establishing a connection to the computer via USB, WiFi, Bluetooth or Ethernet.
Download and install Microsoft Visual Studio Code (VS Code). This is a free multi platform code editor, compatible with Windows, Mac OS and Linux.
Write and run some non-EV3 Python scripts.
Download and unzip the starter project.
Open VS Code, open the starter project folder and install two extensions.
Configure VS Code.
Connect VS Code to your EV3.
Write and run your first EV3 Python script!
Video tutorial link: https://youtu.be/TNXqizQTZhs
Link step by step:
https://sites.google.com/site/ev3devpython/setting-up-vs-code
Time constraints:
Starting from 90 min - double lesson
Exercise
For each path below, program your robot to drive as indicated (if needed use gyro sensor). When it’s done use if statement and/or loop and program robot to repeat behaviour continuously
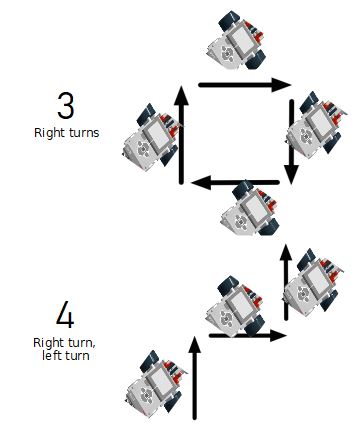
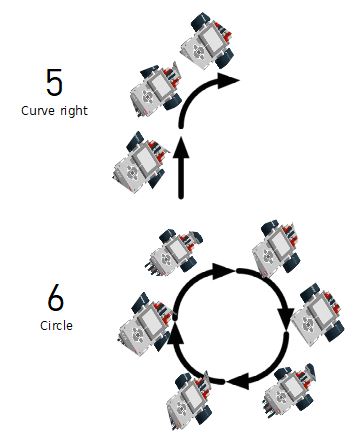
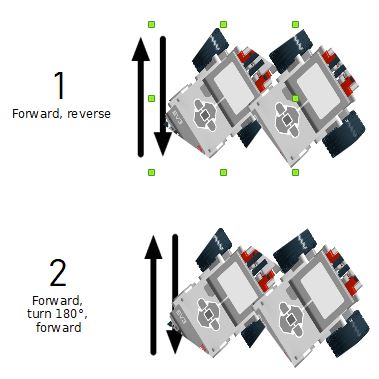
For each path below, program your robot to drive as indicated. Use if statements and/or loops. Complete the following activities with a touch sensor attached to your robot:
Drive forward, stop when the touch sensor is pressed.
Drive (forward / backward), change direction to (backward/forward) when the touch sensor is pressed (repeat behaviour continuously).
Drive forward, turn around when the touch sensor is pressed, continue driving (repeat behaviour continuously).
Wait for the touch sensor to be pressed, drive backward ~50cm (repeat behaviour continuously).
For each path below, program your robot to drive as indicated. Use if statements and/or loops. Complete the following activities with both the touch sensor and the ultrasonic sensor connected to your robot:
Drive forward, stop when there is an obstacle within 30 cm of the robot.
Drive forward, turn around when there is an obstacle within 30 cm of the robot, continue driving (repeat behaviour continuously).
Wait until the touch sensor is pressed, then drive forward until an obstacle is within 30 cm of the robot.
Drive forward until either the touch sensor is pressed OR the robot is within 30 cm of an obstacle, then turn to a new random direction and continue driving (repeat behaviour continuously).
Theory
The if statement
In order to write useful programs, we almost always need the ability to check conditions and change the behavior of the program accordingly. Conditional statements give us this ability. The simplest form is the if statement, which has the general form:
if BOOLEAN EXPRESSION:
STATEMENTS
A few important things to note about if statements: The colon (:) is significant and required. It separates the header of the compound statement from the body. The line after the colon must be indented. It is standard in Python to use four spaces for indenting.
All lines indented the same amount after the colon will be executed whenever the BOOLEAN_EXPRESSION is true.
Here is an example:
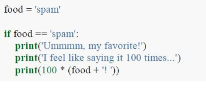
The boolean expression after the if statement is called the condition. If it is true, then all the indented statements get executed.
The while statement
The general syntax for the while statement looks like this:
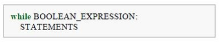
Like the branching statements and the for loop, the while statement is a compound statement consisting of a header and a body. A while loop
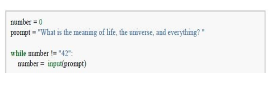
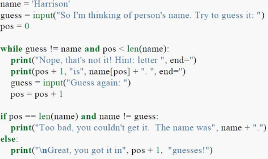
Notice that if the number is set to 42 on the first line, the body of the while statement will not execute at all. Here is a more elaborate example program demonstrating the use of the while statement:
The flow of execution for a while statement works like this:
Evaluate the condition (BOOLEAN EXPRESSION), yielding False or True.
If the condition is false, exit the while statement and continue execution at the next statement.
If the condition is true, execute each of the STATEMENTS in the body and then go back to step 1.
The body consists of all of the statements below the header with the same indentation.
The body of the loop should change the value of one or more variables so that eventually the condition becomes false and the loop terminates. Otherwise the loop will repeat forever, which is called an infinite loop.
An endless source of amusement for computer programmers is the observation that the directions on shampoo, lather, rinse, repeat, are an infinite loop.
In the case here, we can prove that the loop terminates because we know that the value of len(name) is finite, and we can see that the value of pos increments each time through the loop, so eventually it will have to equal len(name). In other cases, it is not so easy to tell.
What you will notice here is that the while loop is more work for you — the programmer — than the equivalent for loop. When using a while loop one has to control the loop variable yourself: give it an initial value, test for completion, and then make sure you change something in the body so that the loop terminates.
Short help on programming
Commands/functions needed for the exercise
will use any button to stop script
#!/usr/bin/env python3

btn = Button()

Connect large motor to port B

mL = LargeMotor('outB');
Run to a position relative to the current position value. The new position will be current position + position_sp. When the new position is reached, the motor will stop using the action specified by stop_action.
#!/usr/bin/env python3

mL.run_to_rel_pos(position_sp= 500, speed_sp = 250)

speed_sp is between 0 and 1000 position_sp >0 Motor will run forward position_sp <0 Motor will run backwards stop_action - can be "coast"or "brake"

mL.stop(stop_action='brake')
Use If you want to make your robot speak
#!/usr/bin/env python3

Sound.speak('Forward').wait()
Plug a gyro sensor into any sensor port
#!/usr/bin/env python3

gyro = GyroSensor()
Read the value from gyro sensor
#!/usr/bin/env python3

gyro.mode = 'GYRO-ANG'

start_angle=gyro.value()
Plug a touch sensor into any sensor port
#!/usr/bin/env python3

ts = TouchSensor()
Read the value from touch sensor
#!/usr/bin/env python3

if ts.value()==0: # touch sensor NOT pressed
Plug an ultrasonic sensor into any sensor port
#!/usr/bin/env python3

us = UltrasonicSensor()
Read the value from an ultrasonic sensor
#!/usr/bin/env python3

us.mode='US-DIST-CM'

Distance=us.value()/10 # convert mm to cm
a ‘bump’ is a release of the touch sensor button
#!/usr/bin/env python3

def WaitForBump():

This function is built into the ev3dev2 library.

  PreviousState=0

  while True:

    CurrentState=ts.value()

    if PreviousState==1 and CurrentState==0: #button was released

      mL.run_forever(speed_sp=400)

      mR.run_forever(speed_sp=400)

      PreviousState=CurrentState # Ready for next loop

      sleep(0.01) # don't read the sensor too frequently

  while True: # forever

    WaitForBump()

    Distance=us.value()/10 # convert mm to cm

    if Distance<30:

      mL.stop(stop_action='brake')

      mR.stop(stop_action='brake')